What a difference a year makes. This has been a huge year for Fisherman's Wife Furniture and for me personally. This marks one full year out of the classroom and being a full time business owner. Somedays I still can't believe it and I am waiting for someone to come take it all away.
Over the past few months, many new followers and readers have come along so I want to do a quick review of my favorite and/or most popular posts from 2013.

Tuesday, December 31, 2013
Monday, December 30, 2013
BIG, BIG News
I know I have had big news before but this one ranks in the top 3 of BIG announcements.
Do y'all know these magazines? You see them in Lowes, Wal-Mart, Barnes & Nobles....everywhere. They are published by the same company as Better Homes and Gardens as special interest publications.

Do y'all know these magazines? You see them in Lowes, Wal-Mart, Barnes & Nobles....everywhere. They are published by the same company as Better Homes and Gardens as special interest publications.

Friday, December 27, 2013
Reupholstered and Refinished Rocker
Happy Friday! Today, I get to show you another Christmas surprise!
I am so excited about this project so let's get right to it and see the before pictures.

I am so excited about this project so let's get right to it and see the before pictures.

Thursday, December 26, 2013
Vanity Makeover
Hi all. I hope everyone had a very, merry Christmas. We traveled to SETX (Southeast Texas) to spend Christmas Eve and Day with my family and now Blittle's parents are staying with us for a few days. Its been a busy week!
It is time for me to show you a Christmas present project. This one is extra special to me because it was given to an extra special someone.
It is time for me to show you a Christmas present project. This one is extra special to me because it was given to an extra special someone.
Monday, December 23, 2013
Dresser to Entertainment Center
Hi all! I know I have been a bad blogger this month with only 1-2 posts a week and I am sorry for that but I have been busy working in the shop on furniture makeovers. The blog is the first thing that gets neglected when I get busy with work. My house cleaning duties are second...we won't talk about the laundry that sat on the end of my bed for more than a few days. This week will be better! The house is clean and blog posts are already written!
Today, I have a quick look at a dresser I turned into an entertainment center.
A repeat customer found an amazing Thomasville, solid wood, 9 drawer dresser and wanted it turned into an entertaiment center. I love projects like this.
Here is the before shot. And yes, I know this is a bad picture. And yes, its the only one I have. Again, bad blogger.

Saturday, December 21, 2013
"The Lorax" End Table- Part 2
So it is crunch time for you last minute shoppers?! Good luck this weekend if any of you are getting out and headed to a mall or shopping center. Yikes!
Y'all remember "The Lorax" end table I made for a baby shower gift to my friend? You can read about it by clicking here. Here are a few reminders.

Y'all remember "The Lorax" end table I made for a baby shower gift to my friend? You can read about it by clicking here. Here are a few reminders.

Monday, December 16, 2013
Coastal Dog Collars
I know this is not furniture but I have tons of friends and followers who are as crazy about their dogs as we are about Sabine and Jaxson. It makes us feel better to have other coo coo, dog people around us. It makes us look not so crazy. :)
Every year we get the dogs new collars for Christmas and like most things, I want to get something different and special. Getting a collar off the shelf at Petco or PetsMart is ok but I prefer to find something that I am not going to see on every other dog in the area. If you haven't discovered the shopping world known as Etsy, you need to venture out. There are some amazing homemade products on there for reasonable prices. Anything from quilts, shirts, baby bags, pillows, furniture. You name it. Even dog collars. This year I wanted a coastal/nautical theme so the first place I started looking was Etsy and I found some super cute collars. It was hard to choose but I love the ones I got.
Every year we get the dogs new collars for Christmas and like most things, I want to get something different and special. Getting a collar off the shelf at Petco or PetsMart is ok but I prefer to find something that I am not going to see on every other dog in the area. If you haven't discovered the shopping world known as Etsy, you need to venture out. There are some amazing homemade products on there for reasonable prices. Anything from quilts, shirts, baby bags, pillows, furniture. You name it. Even dog collars. This year I wanted a coastal/nautical theme so the first place I started looking was Etsy and I found some super cute collars. It was hard to choose but I love the ones I got.
Saturday, December 14, 2013
An Update, an Announcement and a Video
Happy Saturday, y'all! I hope everyone had a great week and has a fun, relaxing day planned.
I am off to spin class this morning then working the rest of the day. I know the blog has been quiet the past few weeks but I have been focused on furniture (and boats) and I have been exhausted. Last week, I only made it past 8:30 PM one night...embarrassing I know. All the other nights I fell asleep watching TV at some ridiculously early time. Another reason I haven't posted much is because several of my current projects are Christmas presents and I can't show them to you yet.
I am off to spin class this morning then working the rest of the day. I know the blog has been quiet the past few weeks but I have been focused on furniture (and boats) and I have been exhausted. Last week, I only made it past 8:30 PM one night...embarrassing I know. All the other nights I fell asleep watching TV at some ridiculously early time. Another reason I haven't posted much is because several of my current projects are Christmas presents and I can't show them to you yet.
Tuesday, December 10, 2013
Guest Room End Tables
Today I am going to show you my end tables in the guest room. Hopefully the guest room will be finished soon and I can reveal the entire room! The theme for the room is navy and white. I want it to have a light, bright, comfortable feel for our guests and a classic look that will last.
Here are the solid wood end tables before.

Here are the solid wood end tables before.

Monday, December 9, 2013
What A Week!
What a week!
Is there an echo in here?
Didn't last week's post start out with that statement?
Yes, it did but for a totally different reason.
Is there an echo in here?
Didn't last week's post start out with that statement?
Yes, it did but for a totally different reason.
Monday, December 2, 2013
Overflowing with Thankfulness....and Furniture
What a week! I hope everyone enjoyed their holiday with friends and family. My husband and I traveled to Southeast Texas Thanksgiving day to see my family, then traveled to central Texas on Saturday to visit his family. For black Friday, I stayed home and worked. I hate shopping so staying up super late, standing in line, and risking my life is not for me.
It was a big, BIG week for Fisherman's Wife Furniture! I was featured by Furniture Flippin' on Wednesday (Read post here) and then my guess post for Remodelaholic was published on Saturday (Read that post here). I am extremely thankful for both of these companies recognizing my (and my husband) hard work and creativity and helping me grow my business. There are not enough "thank you"s to anyone that spreads the word about Fisherman's Wife Furniture!
It was a big, BIG week for Fisherman's Wife Furniture! I was featured by Furniture Flippin' on Wednesday (Read post here) and then my guess post for Remodelaholic was published on Saturday (Read that post here). I am extremely thankful for both of these companies recognizing my (and my husband) hard work and creativity and helping me grow my business. There are not enough "thank you"s to anyone that spreads the word about Fisherman's Wife Furniture!
Thursday, November 28, 2013
Updates and Some Exciting News!
HAPPY THANKSGIVING!
I hope everyone is having a great day! I have many, many, many things to be thankful for every day. Today I am especially thankful BLittle, the dogs and I get to eat lunch with my family, my dad's fried turkey, and my mom's mini pecan pies. I am thankful my bootcamp instructor inspired me to work out the past 3 days like a crazy lady so I can enjoy all those wonderful foods guilt free :)
Things have been really quiet on the blog the past few weeks and I apologize for that. The weather here was super cold and rainy and when the rain stopped it stayed super cold. This Texas girl HATES cold! We are installing an AC/heater in the shop soon so I can stay warm while working and it will keep the temperature high enough for me to paint. Did y'all know if its too cold, paint does some weird things?! I am using that as my excuse for not being productive but if I am being honest, I am really just a baby when it comes to being cold. I am looking forward to the slightly warmer temps next week and the heater in the shop. I can't wait to show y'all some of the projects I have been working on. Remember the Drexel, Bow Front pieces I told y'all about?! Their new looks are in progress! So excited!
Thursday, November 21, 2013
Drexel, Bow Front Pieces
I know I haven't posted all week but honestly, I haven't had anything to post. :(
A project I am working on now is a gift so I can't show pictures or talk about it which makes me sad because it is really cute. I can't wait to show y'all. Another project I am working on is prepping a boat for new paint. Also, Blittle and I started building a boat for a friend. I didn't really think y'all would be interested in our boat projects so I haven't said much about them.
I did decide to put my available pieces in a store located near my neighborhood. It is called Southern Shores Resale. It is a cute store with all kinds of decor items for a reasonable price. If you are in the area check it out! It is located at 3129 Highway 6, Bayou Vista, Texas 77563.
Friday, November 15, 2013
Baby Boy Nursery Dresser
Happy Friday! I am so thankful it is not freezing this morning! That yucky cold weather is getting old already. How many more days until Spring?
Today's post is super short but I wanted to show you a cute dresser I did for a baby boy nursery. This nursery is going to be a fun and happy room for this little baby. They have painted pretty bright orange stripes on the ceiling with grey walls! How fun is that? I can't wait to see the room when it is finished. Here is the dresser/changing station for the room.
Today's post is super short but I wanted to show you a cute dresser I did for a baby boy nursery. This nursery is going to be a fun and happy room for this little baby. They have painted pretty bright orange stripes on the ceiling with grey walls! How fun is that? I can't wait to see the room when it is finished. Here is the dresser/changing station for the room.
Thursday, November 14, 2013
Master Bedroom Reveal
Hi all! As promised, I am showing you our master bedroom today!
For the most part, our master is made up of items we already had. I have only purchased a few new items for the room which I love because reusing is saving! Here is what it looked like when we purchased the home.
For the most part, our master is made up of items we already had. I have only purchased a few new items for the room which I love because reusing is saving! Here is what it looked like when we purchased the home.
Monday, November 11, 2013
Styling a bookcase
Happy Monday! I am not sure how it is Monday already! The past week has been so busy and just flew by without me realizing it.
Today I am going to update you on my bookcase.
Does anyone else have a bookcase with no books? Sounds silly but I know I am not the only one. I love to read but I have had a Kindle for 5 years now so "real" books do not happen at our house. We have our wedding album and a few other photo albums from trips but that is it for anything in book form. So when I found my really cool bookcase I knew it would not be displaying books. I wanted it to display things that are special to us and represents our lifestyle.
There are tons of tutorials and tips on how to style a bookcase. These suggestions apply for displaying books and non books. Here are my favorites:
Monday, November 4, 2013
"The Lorax" End Table
Follow my blog with Bloglovin
Hi all! I hope you had a great weekend. We had a pretty relaxing weekend around here. I had planned to work through the weekend but the weather was so beautiful and I had so many personal things I needed to get done, work was put on hold. I have posted several new items on the "For Sale" page so be sure to go check those out.
Today, I am going to tell you about a precious baby shower gift I did! A friend of mine that I have known my entire life married a girl I have known for years. They are now having a baby! I wanted to do something special for them and go beyond the registry list. Now, for those of you who don't know, straying from the registry is tricky. If you have ever had a registry for a wedding or baby, you know what I am talking about. Those gifts where people try to get you something special and be creative by getting you something not on the list but you have no idea what to do with the present.....or worse....you don't know what it is :o So I decided to reach out to the husband to get some ideas of what they needed and the present could be a huge surprise for the wife. Well, funny story....
Friday, November 1, 2013
1 Year Blogiversary
Happy Birthday, Blog!
I can't beleive it has been a year already. So much has happened and changed in our lives in the past 12 months. Most mornings I wake up in denial that this is my life. One short year ago, I was living in New Orleans, teaching high school geometry and refinishing furniture at night and on the weekends. Now, we are back in Texas and I live in a great little waterfront house (has been our goal since we got married), I am my own boss and I am working from home. Wow. I might be the luckiest girl in the world.
I can't beleive it has been a year already. So much has happened and changed in our lives in the past 12 months. Most mornings I wake up in denial that this is my life. One short year ago, I was living in New Orleans, teaching high school geometry and refinishing furniture at night and on the weekends. Now, we are back in Texas and I live in a great little waterfront house (has been our goal since we got married), I am my own boss and I am working from home. Wow. I might be the luckiest girl in the world.
Monday, October 28, 2013
Cute Dresser Update
Its Monday again. Already. Wow.
A quick weekend wrap up: Thursday evening we took the boat to a local restaurant for dinner. The sunset was gorgeous. The marsh looks amazing at sunset. We spent Saturday on the boat exploring and fishing but not catching. Even though we didn't see a lot of fish, it was a beautiful day to be on the water and to take a break from work. Sunday, a front came through and the sky turned scary while I was drinking my morning coffee. Yikes. The dreary day led to a lazy day after church. I laid around, watched a movie, and of course, fit in an hour or two of work.
A quick weekend wrap up: Thursday evening we took the boat to a local restaurant for dinner. The sunset was gorgeous. The marsh looks amazing at sunset. We spent Saturday on the boat exploring and fishing but not catching. Even though we didn't see a lot of fish, it was a beautiful day to be on the water and to take a break from work. Sunday, a front came through and the sky turned scary while I was drinking my morning coffee. Yikes. The dreary day led to a lazy day after church. I laid around, watched a movie, and of course, fit in an hour or two of work.
Thursday, October 24, 2013
Dressers and a Bookcase
I know, I know. I haven't posted all week. Its funny how things can instantly change. I went from DIY/blogger mode to refinish for client mode overnight.
It all started last Thursday, when I went to North Houston to see my best girlfriend. She had her 4th child a few weeks ago so I went to see the baby again (and her) and to take some pictures of the baby. Baby Taryn is so cute and I loved getting sweet snuggles from her. Here are a few of my favorite pictures.
It all started last Thursday, when I went to North Houston to see my best girlfriend. She had her 4th child a few weeks ago so I went to see the baby again (and her) and to take some pictures of the baby. Baby Taryn is so cute and I loved getting sweet snuggles from her. Here are a few of my favorite pictures.
Tuesday, October 15, 2013
Painting Kitchen Cabinets

When we bought the house I was really worried about the kitchen. There is no where to expand to make it bigger. There is no space to really change the layout. We were stuck with the U-shape kitchen. The space was really dark. There is only the one little window over the sink and all other natural light comes from the bay window in the dining area. I knew I had my work cut out for me which is scary when you are deciding to buy a home. But I knew I could transform the room and took on the challenge. One of the most important choices for the room was paint color.
Monday, October 14, 2013
A Day at "The Place"
Happy Monday. How was your weekend? To be honest, I am not sure where mine went! I do know that it was gloomy all weekend. Here is what it looked like yesterday.

Great Sunday afternoon nap weather.

Great Sunday afternoon nap weather.
Thursday, October 10, 2013
Kitchen Reveal
UPDATE: Click here to see the most recent pictures of the kitchen.
Hi, y'all! Reveal day is here! Finally!

Monday, October 7, 2013
Crazy, Dog People
UPDATED (10/13/13): I added a video at the end of the post of us using the feeding station. The quality is not great but you get to see it in action. Enjoy!
Happy beautiful Monday all! Our area got it's first real taste of fall yesterday. The sun is shining again today and there is a little chill in the air. I personally could live like this for a few months and go back to summer, I love the heat and I hate winter. The dogs are loving the cool weather and have been a little hyper since the front came through.
Speaking of dogs....today, I have a confession to make. Well its not a secret or anything but some of you may not know.....my husband and I are crazy, dog people. These are people who do abnormal, sometimes expensive, time consuming, human child like things for their dogs. You all know one or are one. I have talked about the dogs in the past or they have been in photos but I haven't ever talked about things we have done for them around the house. They are indoor dogs so we have to integrate (I feel like I am back teaching using that word) their needs into our home design. But first, a quick introduction for those of you who are new to the blog or don't know the background of the pups.
Aren't they cute?!
Can you tell Jaxson HATES photos? LOL.
Thursday, October 3, 2013
Glass Tile Backsplash
January 2016 Update: Visit our new blog www.brianandkaylor.com
Hi all! I can't believe it is already Thursday. This week has flown by.
I finished up our tile this week. Tiling is a lot like painting....many stages and waiting for things to dry. I am not going to write a tutorial on tile because there are so many amazing ones out there on the blogosphere and I don't think I can write a better one. My favorite tutorial is from Pretty Handy Girl. She even posted a video. Check out Part 1 here and Part 2 here.
I am going to tell you a few things I did that wasn't on a tutorial or I figured out as I went. This was my first time to tile so I learned a lot!
- Glass tile MUST have a glass certified tile blade
We rented a wet saw and I asked the guys at the store what kind of blade it had. They all assured me it would cut glass even though it wasn't a "glass tile blade". They had some name for the the blade I had not heard of and said it was the best. Alrighty, I guess they know what they are talking about. Well....they don't. At least not with this. We used a the sample tile to test it and the blade tried to eat my expensive tile. Of course the rental store closed at noon on Saturdays and was closed by the time we tested the tile. We went to HD and Lowes and neither one of them had a 10 in glass blade for the saw so we were stuck. To make a long, dramatic story short, we ended up buying a wet saw. It was about $50/day to rent a saw and on that day the rental was useless. Even if we found a glass blade for it we would need it for a few more days just for the backsplash project. A small new one at HD was $130 and they had a glass certified blade for it. We will be tiling our bathrooms over the next year so we felt it was a good investment compared to renting. Here is the one we bought.
Friday, September 27, 2013
3 Month Anniversary
It's been 3 months already! 3 months ago we were spending our first night in the house. Time flies when you are working yourself to death. :)
The house has gone through so many changes and is finally starting to feel like our home. Overall things have gone smoothly (I know things could have been a lot worse) and there have been only a few bumps in the road so far. Having said that, I am exhausted. Everyday I wake up and see what needs to be done. Living through an update is hard on the mind. It is a constant to do list reminder. When the kitchen is finished I will be taking on client work again and will be taking a break from the house. There is a 12 month to do list but nothing urgent needs to be done.
Here is a list and a look back on what's happened over the past 3 months. I plan on writing posts about each room when they are finished but for now here is a quick review.
Thursday, September 26, 2013
Design Doubt
Happy Thursday!
Do you ever doubt your design plan? Or you start putting your pieces together and things just aren't working for you? Sometimes I visualize a design and I am so confident in it. Example: The outdoor seating area. I saw those pillows and knew that the green door left by the previous owners would make a great table and the rug I saw on overstock.com would be a great base to bring everything together. And I love that area and the colors.

Do you ever doubt your design plan? Or you start putting your pieces together and things just aren't working for you? Sometimes I visualize a design and I am so confident in it. Example: The outdoor seating area. I saw those pillows and knew that the green door left by the previous owners would make a great table and the rug I saw on overstock.com would be a great base to bring everything together. And I love that area and the colors.

Thursday, September 19, 2013
DIY Lantern
 |
| Photo Credit: Ever & Anon |
A few months ago I wrote a post named "Let's Talk Lights". Its kind of funny so if you haven't read it, I recommend you do. :)
I mentioned in that post that I was putting the same light fixtures up through out the main living areas. You saw the new lights in the hallway and now you can see the new kitchen lights. No more ugly florescent!!
Before

Monday, September 16, 2013
Coastal Fabrics
Happy Monday! Today I want to tell you about some beautiful fabrics and fabric websites I have discovered.
Over the past few months I have been on the hunt for great fabrics. This is never an easy task. There are not many fabric stores anymore. Everyone knows about Joann Fabric, Hancock and if you're lucky, a Calico Corner is in your area. Problem is, they all carry what I call generic fabrics. Some of them are good quality and have pretty patterns but you see them everywhere. I am always looking for different. My goal was to find fabrics that coordinated but were not too match-matchy and were coastal but not too beachy. Blue, which happens to be both mine and Blittle's favorite color, plays a huge part in our decor. If you have ever been to the Caribbean or other tropical island you know that the shades of blue are endless. It is amazing how many colors the ocean can be. I have decided to focus on teal/turquiose and navy for our main living areas. Pinterest played a huge part in my research but I also have been ripping out magazine pages with new fabric websites to check out. I spent hours on the internet searching for the perfect patterns and colors.
Here are some of the fabrics I have found and are considering for curtains, pillows, and cushion covers.
Friday, September 13, 2013
DIY Butcher Block Countertops
January 2016 Update: Visit our new blog www.brianandkaylor.com
In yesterday's post I talked about how we came to the decision to have butcher block countertops. (Read about it here) Today I am going to tell you how we did it.

This is a really long post but if you are considering doing butcher block countertops yourself, it is worth the time.
In yesterday's post I talked about how we came to the decision to have butcher block countertops. (Read about it here) Today I am going to tell you how we did it.
This is a really long post but if you are considering doing butcher block countertops yourself, it is worth the time.
Thursday, September 12, 2013
Our New Countertops

Let me start this post by announcing butcher block was not my first choice. It wasn't really my second or third....because I didn't have a second and third....LOL. I was head over heels in love with a beautiful countertop and there was no other that could live up to it. If you remember back in my Kitchen Inspiration post I talked about a dream home that had my close to perfect kitchen. Here is a reminder.
Tuesday, September 10, 2013
Waterproofing Under the Sink
January 2016 Update: Visit our new blog www.brianandkaylor.com
Weird things happen under the sink. If you have ever lived in an older home, then you might have had to replace part or all of the cabinet base. Over time all the small (or big) plumbing leaks, spills, and moisture takes its toll on the wood. The area under our sink in the new house was in BAD shape. Swollen and falling apart. Our house was a vacation home and never had full time residents and in the past 9 years, they weren't even using it as a vacation home. It had been sitting empty for a long time so small things like plumbing leaks were neglected and caused problems.


Then we replaced it with a piece of plywood. I caulked all around the edges, primed and painted it the cabinet color.

To prevent future water or moisture damage I wanted to waterproof the area. Some people put vinyl tiles or contact paper down but there are several things I don't like about those options. First, I wanted real waterproofing. No cracks for the moisture to get into or edges for it to get under. Also, I wanted a seamless look. Tile and contact paper don't match the cabinet color perfectly and are obvious. I like things uniform and consistent so I bought this.


Weird things happen under the sink. If you have ever lived in an older home, then you might have had to replace part or all of the cabinet base. Over time all the small (or big) plumbing leaks, spills, and moisture takes its toll on the wood. The area under our sink in the new house was in BAD shape. Swollen and falling apart. Our house was a vacation home and never had full time residents and in the past 9 years, they weren't even using it as a vacation home. It had been sitting empty for a long time so small things like plumbing leaks were neglected and caused problems.
This is what it looked like when we bought the house.

Since our base was so bad, we cut out the entire base area.

Then we replaced it with a piece of plywood. I caulked all around the edges, primed and painted it the cabinet color.

To prevent future water or moisture damage I wanted to waterproof the area. Some people put vinyl tiles or contact paper down but there are several things I don't like about those options. First, I wanted real waterproofing. No cracks for the moisture to get into or edges for it to get under. Also, I wanted a seamless look. Tile and contact paper don't match the cabinet color perfectly and are obvious. I like things uniform and consistent so I bought this.

Its like plastic in a can. Strange and fascinating all at the same time. Rust-oleum just released a waterproof product that seems to do the same thing but I had already purchased the Plasti Dip when I saw the Rust-oleum product so I stayed with the Plasti Dip. It is about $8 a can and comes in many colors including gloss (clear). Before using the product be sure you have fixed all leaks, caulked any gaps if you replaced the cabinet base, and protect areas that you do not want exposed to over spray! I taped off a 6 inch rim and taped off the sides of my cabinets to protect them. I also covered my floors in front of the cabinet with a blanket. (Excuse the bad photos. These are all iPhone photos because I have been too tired to worry about the good camera. Sorry folks...I get to be lazy sometimes.)


WARNING: This stuff stinks! Very powerful. I wore my full chemical safety face mask that I use in the paint booth. I opened windows and I turned the vent on high. Be sure to have plenty of FRESH AIR ventilation. Turning on the vent over the stove will not be enough. A good way to help bring in fresh air is to put a small fan in an opened window to blow in outside air.
I put two coats waiting at least 4 hours between coats. Super easy to work with except for the smell. Now I have a water resistant base under the sink that will be durable enough to handle any water leaks and moisture for many years. This also makes for easy clean up if you keep cleaners or the trash under the sink.

Can you even see it?! It looks like any other cabinet base but it does feel different. If you look close, you can barely see the edge where the texture changes. Here is a close up.

You wouldn't know that this base is different than the others if I had not told you! LOVE! Just another idea for you DIYers looking for a better option to deal with the moisture problems under the sink. This is easy and affordable so anyone can do this. If you don't have previous water damage this project is super easy! Just tape off and spray!
Here is another reminder of what a little work can do.


Click here to see the finished kitchen.
Saturday, September 7, 2013
DIY Floor Cleaner
Hi all!
I hope everyone had a great week. I don't have much to talk about today so this post is short and sweet.
Things in the kitchen are going well but have slowed down. The countertops are installed and have to be "waterproofed" now (more on that later). I have to put many coats of several products on every 24 hours then after the last coat it needs 7 days to cure. SLOW. A 24 hours dry time is almost painful to me at this point. We are so close! Until the countertops are done, I can't do the backsplash...hopefully next weekend will be the start of that adventure.
I have painted the office, put in it's new ceiling fan, worked on our dining room table, and worked on another dresser (this one for me) this week! Very productive!
Just so I didn't post for a whole week again, I want to share with your a great floor cleaner I came across on Pinterest. We put laminate floors in our first home and I hated that I could always see my mop marks on the floor after I cleaned it. I would have to dry the floor with a towel to get a streak free look. So after we had our vinyl planks put in the new house, I was a little worried about mopping them. I found a DIY floor cleaner recipe on Pinterest and I LOVE it.
1 Cup White Vinegar
1 Cup 70% Rubbing Alcohol
1 Cup Water
Several Drops of your favorite dish soap (I use Dawn)
This can be modified, of course, but its mostly about equal parts of each then some soap. It works great! The alcohol makes the moisture evaporate quickly so no streaks and no staying off the floor for a long time to let it dry. You can put it in a spray bottle or I found this guy at Target.

Its the Rubbermaid Reveal Spray Mop. You can put whatever kind of cleaner you want in the bottle and it sprays from the mop (like a Swiffer). The pads can be put in the laundry and you can buy several extras! Love this. It is easy to store and the pads have held up well in the wash.
Just a side note: I saw one lady post that it smells "yucky" on Pinterest but I don't agree. When you first use it, there is a vinegary smell but it fades quickly and the floors will look clean and the room will smell clean. If you think the vinegar smell is too much, put a little less in your mixture.
Happy weekend everybody!
Monday, September 2, 2013
A Rough Week
Happy Labor Day! I hope everyone has a great, relaxing day planned.
I haven't posted in over a week! That is mostly because I haven't had much to post about. It was a slow week....and not because I am slow. Nothing was easy last week. NOTHING!
Last weekend we installed the countertops. The sink had to be installed at the same time due to its large size and my cabinet doors being so small. For the most part, things went smoothly on this project but it was time consuming. I will post more info about the countertops in a few days but here is a little peek at the sink install.


All the cabinet bases are painted and the countertops were installed, it was time to start hooking up appliances. I wasn't overly worried about this since our cabinets were built for standard appliances so I knew all our appliances would fit the spaces well. The problem was hooking them up. None of the fittings attached directly to the appliances. I had to find new fittings and hoses so the new appliances would fit the old hook ups in the house. FRUSTRATING!
On Monday, I started working under the sink. The garbage disposal and sink plumbing had to be put back in as well as hook up the dishwasher.

I knew the plumbing from the garbage disposal to the existing p trap was not going to line up correctly because our new sink is a lot deeper than the old. The garbage disposal was easy to install but I really wasn't confident in what I was doing with the plumbing. After several trips to Lowes, I finally got all the plumbing to line up and connected. I also got the dishwasher put hooked up and pushed back. That came with its own set of issues. It took several more trips to Lowes to find the correct connections to get the dishwasher hooked up to the waterline. I finally got that done, got the wiring done, and pushed it back into the opening so all I needed was to hook up the drain hose to the garbage disposal to be done. The hose wouldn't reach! AHHHH! Back to Lowes, to find a connector and extension.
All this took several days. I got very discouraged and frustrated and had the energy sucked out of me. It was horrible. I worked so hard everyday and barely made any progress. To recoup and take care of my mental health, I took a personal day on Friday. It was necessary. I was so tired and unmotivated. Nothing was going well and it became apparent to me that nothing about these appliances was going to be easy.
Saturday, we put in some new valves under the sink to eliminate some of the hoses and to reduce leaking. Brian turned off the water to the house. I unscrewed the old valves and put on the new ones. First try, we had a leak. Made some adjustments and still had a leak. Every time there was a leak, I had to unhook the sink lines, and take off the new valves, make the adjustments then reinstall everything. Very time consuming. So by the third time I was ready to hurt something or someone. I made some more adjustments and had less of a leak. Finally, on the fourth go, when Brian turned the water back on I couldn't tell. No leaks. WOOHOO.
So after all this, it was finally time to open all the valves and try out the sink, check the plumbing, and garbage disposal. We also turned on the valves to the dishwasher and refrigerator. That is the kind of moment I say that classic line, "Hang on to your butts". I had wrenches and towels in hand as well as one hand still on the valves in case they needed to be turned back off. First the sink. It worked great! I have running water in my kitchen!!!!!!!

After a few minutes I noticed a leak in the p trap. I tighten some things and it was gone. Then I opened the valve to the dishwasher and heard water dripping. PLEASE PUNCH ME IN THE FACE! To get to the leak, I had to totally unhook the dishwasher and pull it out. After tightening some stuff and making more adjustments, I got it back in. No leaks. Then we turned it on to make sure the drain hose didn't have leaks. No leaks. Thank goodness. Finally making some progress.

Lastly, I opened the water valve to the refrigerator hoping for no leaks. Worked great! We have ice!!! And cold, filtered water from the fridge!! I almost forgot what it was like to have a functioning kitchen.
Yesterday, we moved on to the over the range microwave oven. There was a vent hood there previously so the duct work was already there for venting and all we had to do was install the microwave on the wall and to the upper cabinets.

I am not sure why, but I looked up the pipe with a flashlight. All I saw was insulation!!!!! It went into the attic but was plugged up with insulation so it really went no where!! Really?!?!?! SOMEONE SHOOT ME! So, we went to Lowes, probably the 20th time in 5 days, not an exaggeration and we had to get the materials to bring the venting duct work through the attic and to an exterior wall. Thankfully Brian climbed the crazy tall ladder (remember our kitchen is on the second floor so our attic is at third floor level) to cut a hole in the side of the house and install the outdoor vent. Although it went well, it was still frustrating. One more thing that was not as fast or as cheap as we were hoping. After installation it does work and looks great!


All that is left now is the stove. We decided to push it back in the cabinets to make sure everything was lining up and fitting. It fit into the cabinet and in between the countertops but wouldn't push back all the way. There isn't much behind it, an outlet and the gas hook up but thats it. After several tries we figured out our gas valve is too high on the wall and is not low enough to let the stove push back all the way. STAB ME IN THE EYE NOW! I have to call a gas guy tomorrow to get it changed.
Overall we did get stuff done but it doesn't reflect how much time and effort was put in this week. I am reminding myself to stay positive, at least we got something accomplished, and to remember that it is almost done. I am not going to lie....there were moments I wanted to throw myself on the floor and start yelling and crying but I refrained. I have to remember we are in the homestretch. I am about to have an amazing and beautiful kitchen that my husband and I DIYed so I also saved a lot of money and put sweat equity into my home. Its almost done and life will go back to normal.
Today, I am prepping the spare room that will be the office/fly-tying/craft room for paint and unloading/washing dishes and putting them in their new home. If you look in the reflection of the microwave you can see my plates and glasses are already washed and in the cabinets!
Staying hopeful things will be easier this week.
I haven't posted in over a week! That is mostly because I haven't had much to post about. It was a slow week....and not because I am slow. Nothing was easy last week. NOTHING!
Last weekend we installed the countertops. The sink had to be installed at the same time due to its large size and my cabinet doors being so small. For the most part, things went smoothly on this project but it was time consuming. I will post more info about the countertops in a few days but here is a little peek at the sink install.


On Monday, I started working under the sink. The garbage disposal and sink plumbing had to be put back in as well as hook up the dishwasher.

I knew the plumbing from the garbage disposal to the existing p trap was not going to line up correctly because our new sink is a lot deeper than the old. The garbage disposal was easy to install but I really wasn't confident in what I was doing with the plumbing. After several trips to Lowes, I finally got all the plumbing to line up and connected. I also got the dishwasher put hooked up and pushed back. That came with its own set of issues. It took several more trips to Lowes to find the correct connections to get the dishwasher hooked up to the waterline. I finally got that done, got the wiring done, and pushed it back into the opening so all I needed was to hook up the drain hose to the garbage disposal to be done. The hose wouldn't reach! AHHHH! Back to Lowes, to find a connector and extension.
All this took several days. I got very discouraged and frustrated and had the energy sucked out of me. It was horrible. I worked so hard everyday and barely made any progress. To recoup and take care of my mental health, I took a personal day on Friday. It was necessary. I was so tired and unmotivated. Nothing was going well and it became apparent to me that nothing about these appliances was going to be easy.
Saturday, we put in some new valves under the sink to eliminate some of the hoses and to reduce leaking. Brian turned off the water to the house. I unscrewed the old valves and put on the new ones. First try, we had a leak. Made some adjustments and still had a leak. Every time there was a leak, I had to unhook the sink lines, and take off the new valves, make the adjustments then reinstall everything. Very time consuming. So by the third time I was ready to hurt something or someone. I made some more adjustments and had less of a leak. Finally, on the fourth go, when Brian turned the water back on I couldn't tell. No leaks. WOOHOO.
So after all this, it was finally time to open all the valves and try out the sink, check the plumbing, and garbage disposal. We also turned on the valves to the dishwasher and refrigerator. That is the kind of moment I say that classic line, "Hang on to your butts". I had wrenches and towels in hand as well as one hand still on the valves in case they needed to be turned back off. First the sink. It worked great! I have running water in my kitchen!!!!!!!

After a few minutes I noticed a leak in the p trap. I tighten some things and it was gone. Then I opened the valve to the dishwasher and heard water dripping. PLEASE PUNCH ME IN THE FACE! To get to the leak, I had to totally unhook the dishwasher and pull it out. After tightening some stuff and making more adjustments, I got it back in. No leaks. Then we turned it on to make sure the drain hose didn't have leaks. No leaks. Thank goodness. Finally making some progress.

Lastly, I opened the water valve to the refrigerator hoping for no leaks. Worked great! We have ice!!! And cold, filtered water from the fridge!! I almost forgot what it was like to have a functioning kitchen.
Yesterday, we moved on to the over the range microwave oven. There was a vent hood there previously so the duct work was already there for venting and all we had to do was install the microwave on the wall and to the upper cabinets.

I am not sure why, but I looked up the pipe with a flashlight. All I saw was insulation!!!!! It went into the attic but was plugged up with insulation so it really went no where!! Really?!?!?! SOMEONE SHOOT ME! So, we went to Lowes, probably the 20th time in 5 days, not an exaggeration and we had to get the materials to bring the venting duct work through the attic and to an exterior wall. Thankfully Brian climbed the crazy tall ladder (remember our kitchen is on the second floor so our attic is at third floor level) to cut a hole in the side of the house and install the outdoor vent. Although it went well, it was still frustrating. One more thing that was not as fast or as cheap as we were hoping. After installation it does work and looks great!


All that is left now is the stove. We decided to push it back in the cabinets to make sure everything was lining up and fitting. It fit into the cabinet and in between the countertops but wouldn't push back all the way. There isn't much behind it, an outlet and the gas hook up but thats it. After several tries we figured out our gas valve is too high on the wall and is not low enough to let the stove push back all the way. STAB ME IN THE EYE NOW! I have to call a gas guy tomorrow to get it changed.
Overall we did get stuff done but it doesn't reflect how much time and effort was put in this week. I am reminding myself to stay positive, at least we got something accomplished, and to remember that it is almost done. I am not going to lie....there were moments I wanted to throw myself on the floor and start yelling and crying but I refrained. I have to remember we are in the homestretch. I am about to have an amazing and beautiful kitchen that my husband and I DIYed so I also saved a lot of money and put sweat equity into my home. Its almost done and life will go back to normal.
Today, I am prepping the spare room that will be the office/fly-tying/craft room for paint and unloading/washing dishes and putting them in their new home. If you look in the reflection of the microwave you can see my plates and glasses are already washed and in the cabinets!
Staying hopeful things will be easier this week.
Click here to see the finished kitchen.
Friday, August 23, 2013
Hinges & Knobs
It's Friday!! And I have posted 3 days in a row! Don't get used to it people. We all know it is a small miracle. I am not promising this next week. :) But I will try.
I hope everyone has a great, relaxing weekend planned. Our plan is to work on the kitchen. Surprise, surprise. It's almost done and we are getting super excited.
I haven't really talked about our budget for the kitchen update but we do have one and I have tried really hard to stick to it. There are many things I found online or we decided to go with a different product so we saved money. Then there are a few items that we splurged on. One of the biggest splurges was on the hinges. Hinges? Yes, hinges. Sounds silly, I know, but it was worth it.
I have dealt with hinges and other hardware a lot working with furniture. I don't mind painting pulls and knobs but painting hinges is a sin. Even the best paint can not handle the constant moving and rubbing that happens with hinges. Problem with this philosophy is I have to be able to incorporate the original color of the hinges, assuming they are in good enough shape to reuse, or I have to find new ones that will work/fit. You would think finding new ones would be easy but its not. Time and time again I have purchased new hinges that seem to be the same size (same hole spacing, same length, etc) but then when I install them, things don't line up correctly. The problem....apparently now the cylinder in a hinge is made bigger and it messes everything up!

This happened when I tried to replace our kitchen hinges. Our old ones were tarnished/dirty brass color and I wanted polished chrome. There were 3 different sets at the local stores that looked exactly like our old ones but when we installed them NONE of them worked. AHHHH! I was so frustrated. I really didn't know what to do. I could not have those ugly old ones in my kitchen. It would ruin what I was trying to accomplish. Using one of the other sets would consist of filling all the old nail holes, sanding them smooth and drilling holes for the new hinges and it would be extremely time consuming. Also, there was a chance that after all that, the new hinges still might not line the doors up correctly.
So since I couldn't find new ones, I started researching on how to change the old ones. Not paint. Change. Forever change. I looked into powder coating and chrome plating. We decided to go with chrome plating. Where do you get that done you ask? A custom auto body shop, that's where. My husband found a place near his work that does chrome plating on vehicle parts. Speed & Sport Chrome Plating said they could do my hinges! PERFECT! They did one as a test piece and it is beautiful. Finally, an answer to my problem and it was gorgeous. Just look at this before and after.

Then I had a new problem. The price. They gave us an estimate to do all 50 hinges. I had to sit down. I didn't want to do the chrome plating anymore. It was way over budget. I get sweaty palms when I have to spend a lot of money and I sweaty all over when I heard the quote. My husband reasoned with me and twisted my arm a bit and I finally gave in. All the time we were saving, the professional look we were going to get and knowing that these hinges could handle all the opening and closing, would be worth it....hopefully. Brian walked himself into an auto body shop that has done work for famous people with a gallon ziploc baggie full of hinges. Then later that week he walked out with a box of beautiful chrome hinges.

BEAUTIFUL! Shiny hinges that fit my kitchen cabinet door perfectly and I didn't have to fill or drill any holes. Love that.
Here are my knobs. There are no pulls in our kitchen. All of our drawers are pretty small and they all previously had knobs so I kept it that way. I found these gorgeous glass knobs here. This online store has tons of pulls and knobs to choose from at a great price.


I talked about our other appliances here but I haven't mentioned the sink and faucet yet. I purchased both online and saved. The faucet I saw in a store and liked it's look and functionality. After doing a little online research, I found it at an online kitchen store for half the price!


My sink is a gigantor (yes, that is a word) undermount, single basin, stainless steel and is 11 inches deep! It is a small swimming pool really. I wanted a sink big enough to fit my cast iron skillet (my go to pan) flat on the bottom and I wanted it to fit a casserole/baking dish to soak. I purchased it on Overstock.com for an under budget price, too! Love that feeling.

Thanks to everyone that is reading and spreading the word about my business. Remember to subscribe to follow me by email to get notices when I update the blog. Also, my paint booth is done and as soon as the kitchen is finished, I will be taking on furniture jobs again. If you are interested in getting some work done or are looking for a piece, let me know! Email me at fishermanswifefurniture@yahoo.com or message me on Facebook.
Have a great weekend. Wish us luck on our next step in the kitchen. It is going to be a hard weekend but hopefully we will get a lot accomplished and I will have tons of updates for next week!
Click here to see the finished kitchen.
Thursday, August 22, 2013
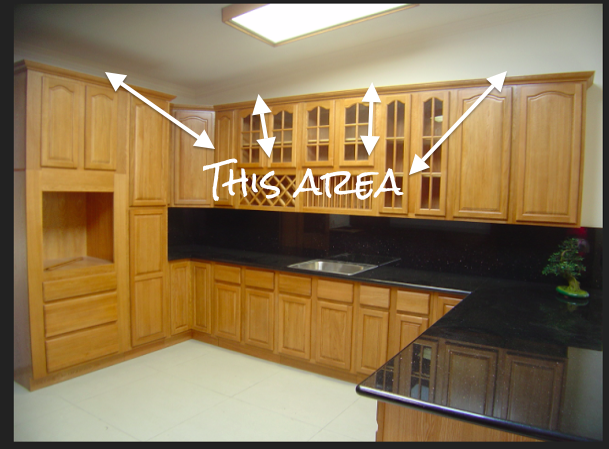
Covering Fur Down - The Space Above the Cabinets
January 2016 Update: Visit our new blog www.brianandkaylor.com
Changing that space above your cabinets is a great way to update your kitchen.

You know that annoying space between the top of the kitchen cabinets and the ceiling? What is that? And why did someone ever think it was a good idea to leave it blank? You all know what I am talking about.

Or it is filled in with useless wall like I have. The construction term is fur down.

Only in the past few years have cabinet styles changed to where they extend to the ceiling. This is the look I like.

In New Orleans we had crazy tall ceilings and the space between the cabinets and the ceiling was huge. So just like everyone else, I filled that space with dust collectors.

I loathe this space. If we had purchased new cabinets, I would have tore it out and had our cabinets built to the ceiling. But we used our current cabinets so I had to figure out a way to hide the fur down. Your home might have AC and/or other wires and pipes going through the fur down so you can't remove yours without the huge cost to run all those wires and pipes somewhere else. Making it look like it was built in and giving the illusion that our cabinets were built to the ceiling was the only option I had.
The before pictures.


While researching for a refrigerator enclosure idea, I came across this blog. She started with an empty space above her cabinets so she filled it in with MDF, and then finished off with moulding. I love her final look.
I already had the fur down in my kitchen so I didn't need to fill in the space but I did need to smooth the texture. Doing several thin layers, I filled in the texture with a light weight compound. I spread it all over, sanded, filled some more, sanded again. I did this until it was filled in and smooth.
Then I moved on to the moulding. I went with a 3 5/8 inch crown moulding (nothing crazy) and a chair rail moulding for the middle. Both are extended throughout the kitchen where there is fur down and the crown moulding is extended through to the dining area. We will be adding crown moulding to all the rooms in the house eventually.


SIDE NOTE: Our saw was not in good condition and we ended up buying a new one. This saw had a chart on it as well as had the degrees needed for mouldings marked. This made things a lot easier but moulding can still be frustrating. Once you get the hang of it, it is worth the time and the few "discussions" with your spouse.
Remember the whole idea here is to make this look like it is part of the cabinetry. I wanted a seamless look. It took some tedious, time consuming, detail work but the final product was so worth it. It looks amazing! Here is the after but I am still hiding the rest of the kitchen. Sorry folks. Your going to have to keep being patient. :)


LOVE!!!! Our cabinets have entered this decade and look expensive! A DIYer's dream. Expensive look without the huge expense. I still stare at them because I can't believe how much they have changed.
You can use moulding to change your cabinet doors, too. I did not do this but if you are wanting to update your kitchen without replacing cabinets, adding moulding is a great way to do it.


Changing that space above your cabinets is a great way to update your kitchen.
You know that annoying space between the top of the kitchen cabinets and the ceiling? What is that? And why did someone ever think it was a good idea to leave it blank? You all know what I am talking about.
Or it is filled in with useless wall like I have. The construction term is fur down.

Only in the past few years have cabinet styles changed to where they extend to the ceiling. This is the look I like.

In New Orleans we had crazy tall ceilings and the space between the cabinets and the ceiling was huge. So just like everyone else, I filled that space with dust collectors.

I loathe this space. If we had purchased new cabinets, I would have tore it out and had our cabinets built to the ceiling. But we used our current cabinets so I had to figure out a way to hide the fur down. Your home might have AC and/or other wires and pipes going through the fur down so you can't remove yours without the huge cost to run all those wires and pipes somewhere else. Making it look like it was built in and giving the illusion that our cabinets were built to the ceiling was the only option I had.
The before pictures.
While researching for a refrigerator enclosure idea, I came across this blog. She started with an empty space above her cabinets so she filled it in with MDF, and then finished off with moulding. I love her final look.
I already had the fur down in my kitchen so I didn't need to fill in the space but I did need to smooth the texture. Doing several thin layers, I filled in the texture with a light weight compound. I spread it all over, sanded, filled some more, sanded again. I did this until it was filled in and smooth.
Then I moved on to the moulding. I went with a 3 5/8 inch crown moulding (nothing crazy) and a chair rail moulding for the middle. Both are extended throughout the kitchen where there is fur down and the crown moulding is extended through to the dining area. We will be adding crown moulding to all the rooms in the house eventually.


Remember the whole idea here is to make this look like it is part of the cabinetry. I wanted a seamless look. It took some tedious, time consuming, detail work but the final product was so worth it. It looks amazing! Here is the after but I am still hiding the rest of the kitchen. Sorry folks. Your going to have to keep being patient. :)
LOVE!!!! Our cabinets have entered this decade and look expensive! A DIYer's dream. Expensive look without the huge expense. I still stare at them because I can't believe how much they have changed.
You can use moulding to change your cabinet doors, too. I did not do this but if you are wanting to update your kitchen without replacing cabinets, adding moulding is a great way to do it.
Click here to see all the before and after pictures.
Subscribe to:
Posts (Atom)