
Planning is extremely important! There is a lot to think about when you are prepping a shower space and when the space is stripped down, you have to be sure to do all needed changes BEFORE the backboard goes up get done.
BEFORE THE SHOWER PAN:
- Our enclave originally had a single fiberglass tub/shower unit. The studs were not perfectly aligned and the subfloor was at a different level than the rest of the room. We had to add another layer of subfloor to make everything level.
- We are going to have a frameless shower door which is extremely heavy and needs plenty of support. We added studs where the door will be using the Kreg Jig to make pocket holes, then screwed the new 2x4s into an existing stud.


- All the plumbing was done. Since we have been married (almost 9 years), we have wanted a shower with multiple shower heads. Just a big walk in shower that can be for one person with several shower heads on them or can easily accommodate two people. In the new shower, each side has its own on/off, temperature control and its own shower head(s). The plumber thought it was overkill for a 3' x 5' shower, and it might be, but it is what we always wanted. There were a few more options we considered but felt this was best.


- The shower niche was framed out. My only requirement for the shower niche was not to be on the back wall. The back wall of the shower is the first things you see when you walk into the bathroom and I would rather have a pretty, solid tiled wall to look at than shampoos and soaps. I had to wait until all the new plumbing was put in to decided on where the niche would go. There was only one spot a niche would fit so I framed out one tall niche that will have several shelves. (I will be doing a niche tutorial once the entire shower is done.) My only dislike about the niche so far is that it is really close to the back wall so there will be some small cuts of tile.
THE SHOWER PAN:
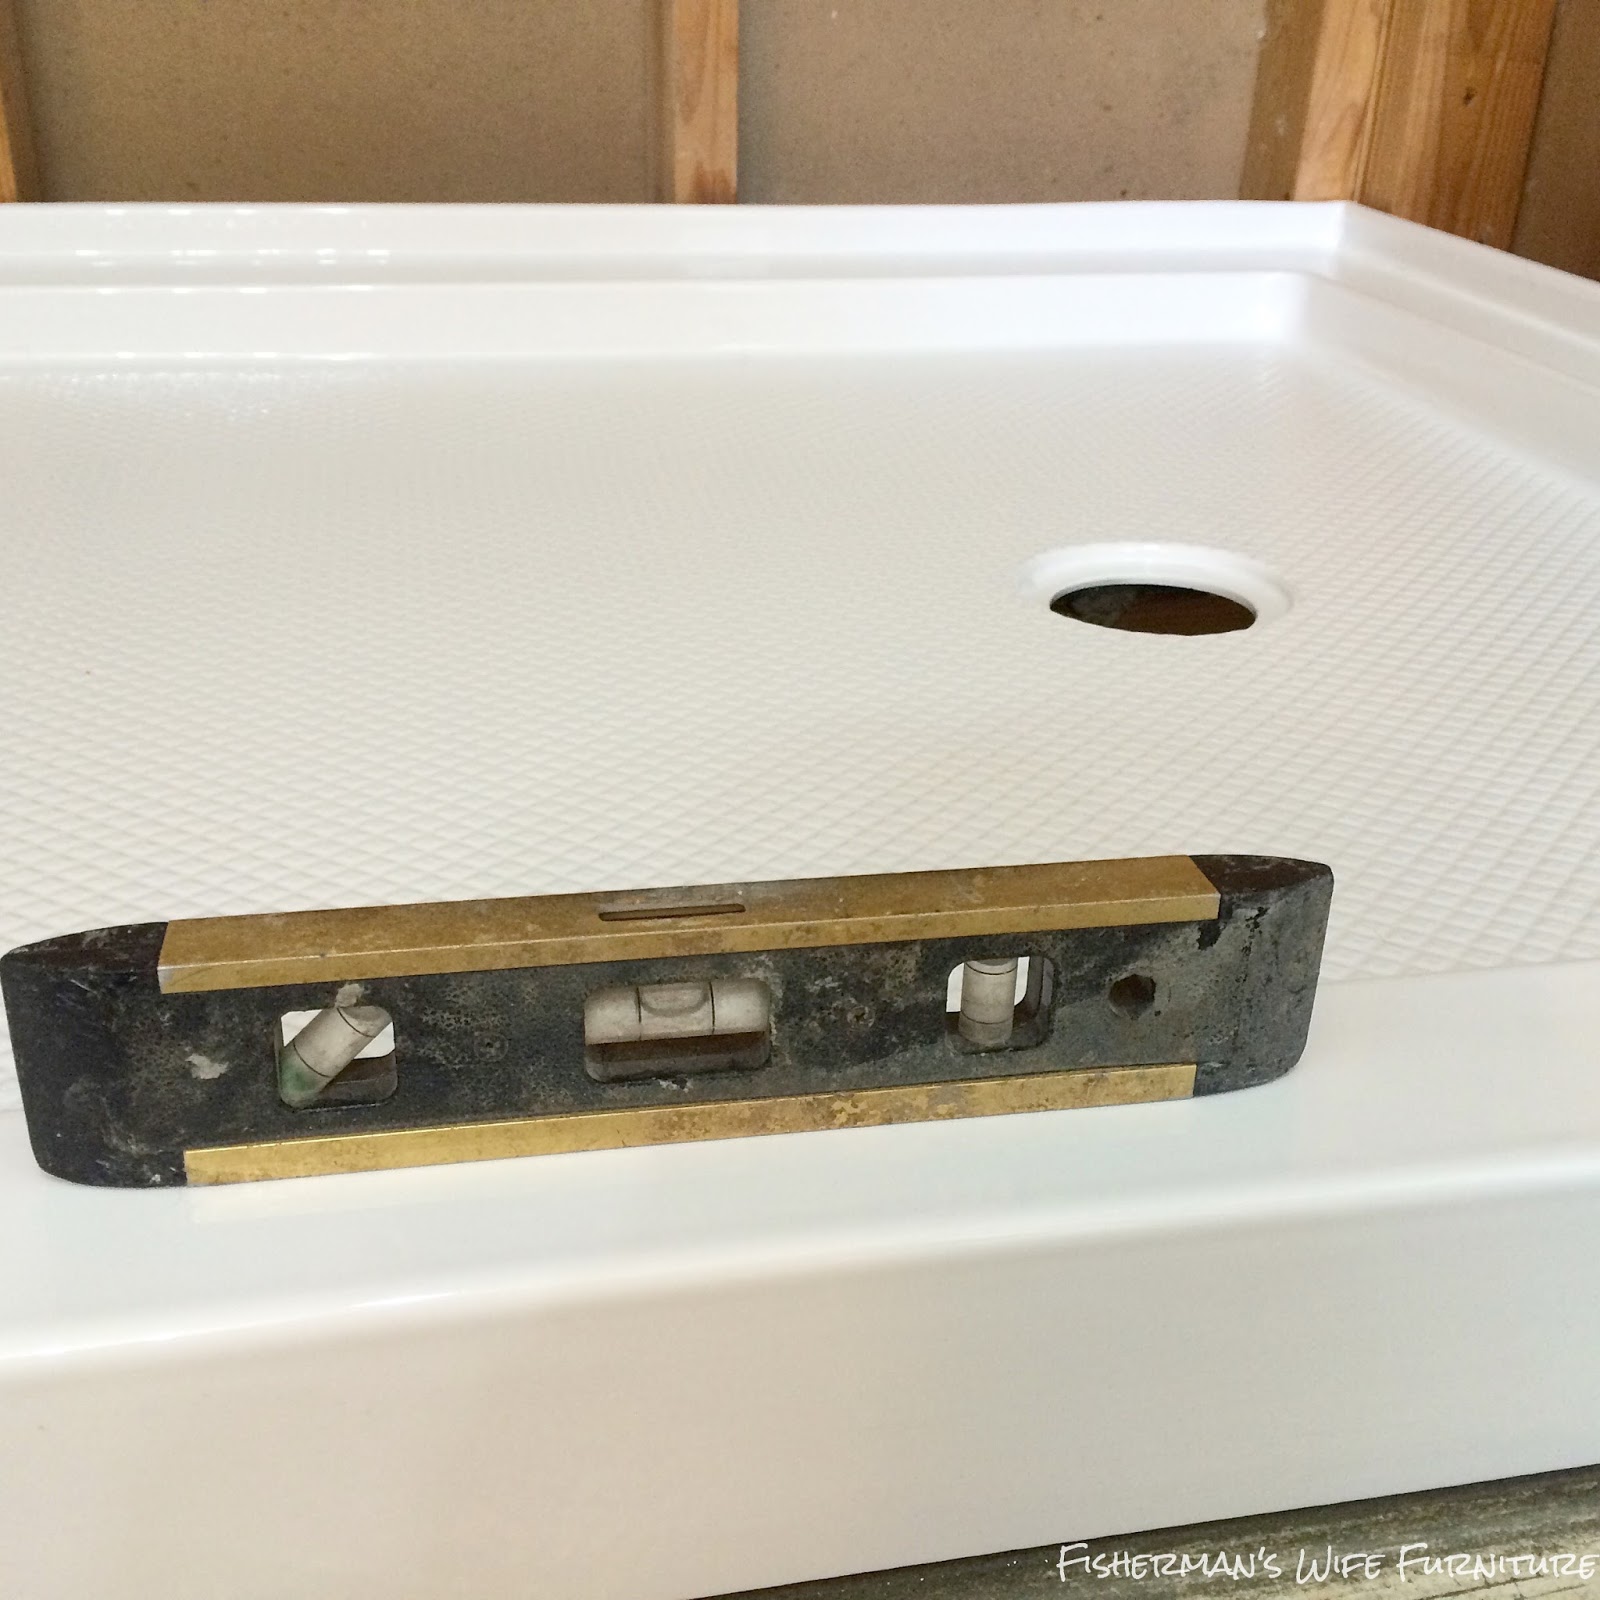
Once we got all that work done, the shower pan went in. The original plan was to buy a tile ready shower pan and have a tiled shower floor. When I changed the budget and decided to go with the white subway tile, I also decided to use a finished, pre-made shower pan. This saved a lot of time and money. A tile ready shower pan for a 36" x 60" shower is in the $500-$700 range plus you have to tile over it (more cost). You can make/pour your own shower pan but it wasn't something I was willing to take on right now. The finished, white shower pan I purchased cost around $300 and there was no tiling. You install then you are done.
Installation was pretty easy. The pan is large which makes it awkward to handle but with two people, it is easy to manage. We tested it in the space to make sure it fit and we also marked the new drain location.
SIDE NOTE: Since we live on the second floor and have access to all our plumbing in our garage, we did not have to install the new drain at the time of the shower pan installation. Most of you will have to hook the drain up to the plumbing when installing.

We cut a new hole for the new drain, laid a mortar bed, then put in the shower pan. Make sure the edges are level! The bottom of the pan is sloped for water drainage so if the pan edges are level, your pan floor should be sloping towards the drain.
PLASTIC WATERPROOFING:
Next came some plastic waterproofing. I have read and watched countless blogs, articles and videos about shower prep and tiling. Some people did this plastic barrier step. Some didn't. We decided it was a small cost for more water protection. Just in case something fails and water gets behind the backboard, this plastic barrier will carry the water down into the shower pan instead of water going into the wall. We decided to only put it 4 feet high since that is where most of the water is when you take a shower. The plastic is just stapled in a few spots to the studs then we used a crazy strong tape to adhere it to the shower pan lip.

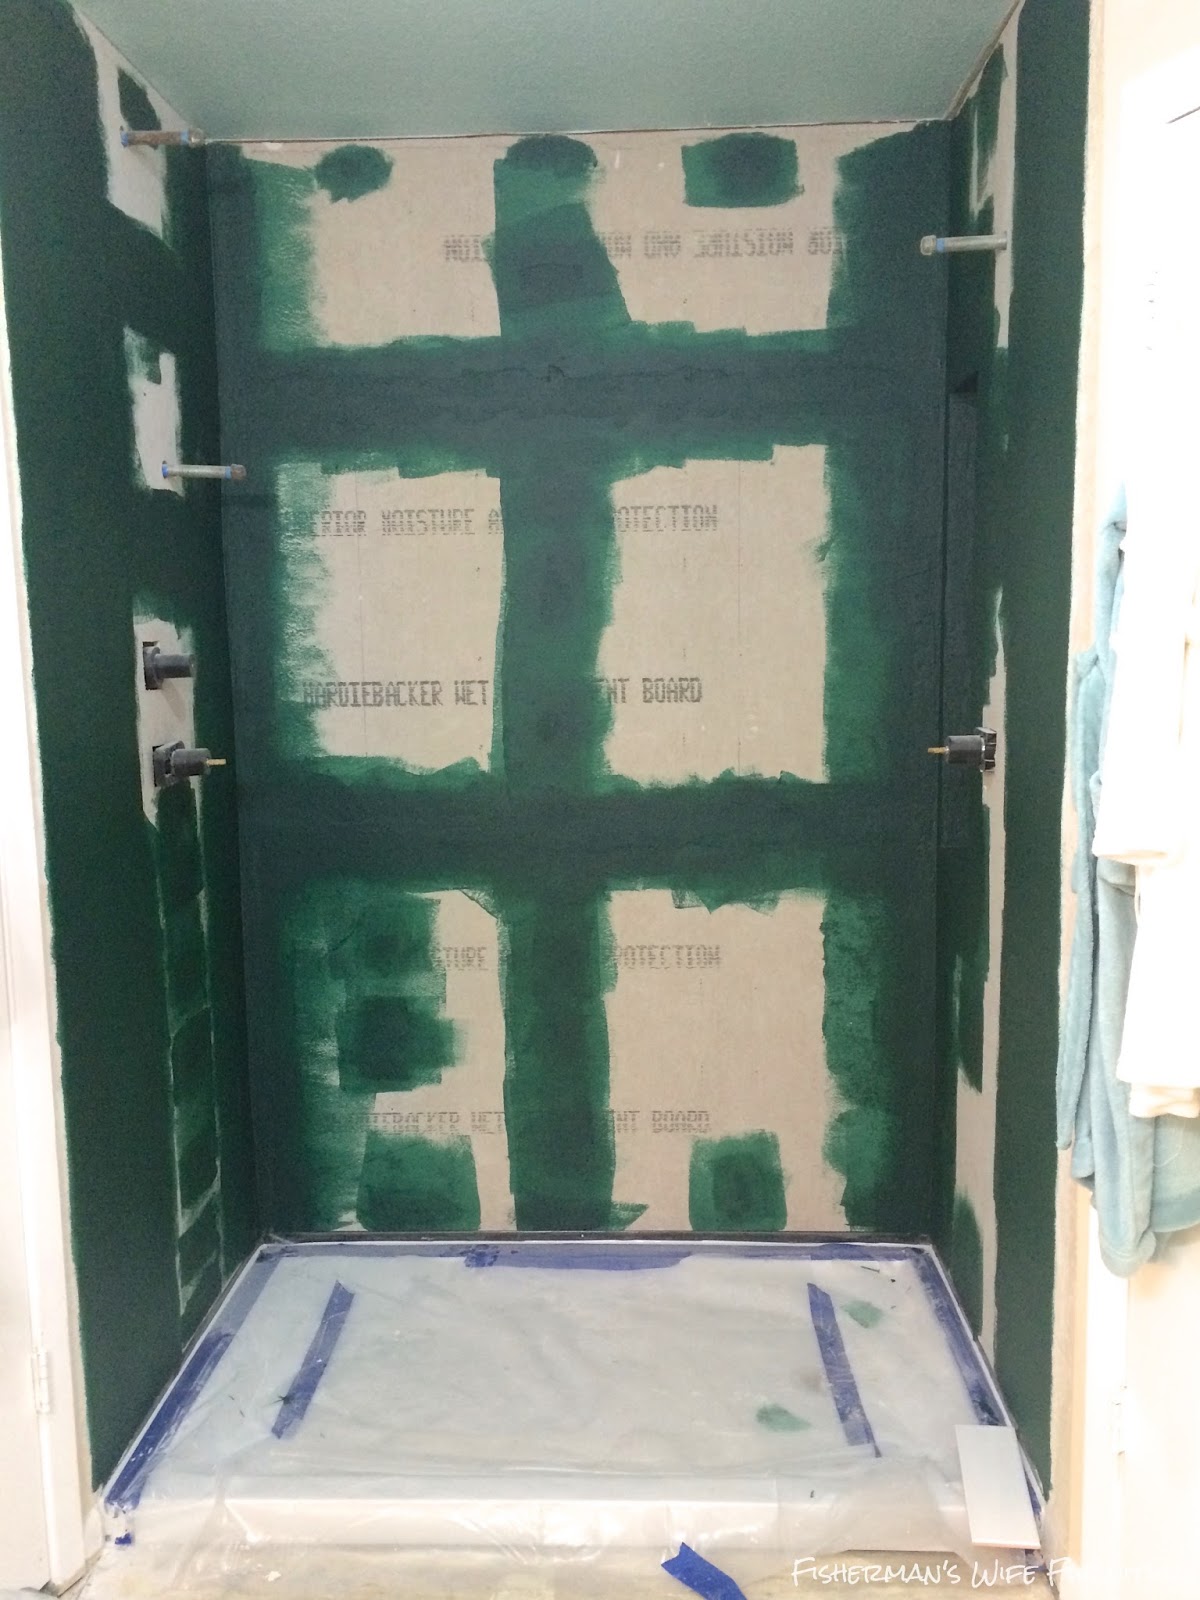
BACKERBOARD:
I went with Hardi Plank cement board for the backer board material. Wear a mask and eyewear for sure when cutting this stuff. It makes a mess! We used a jig saw with super strong blades to make cuts.
SIDE NOTE: A drill driver makes things much easier when you are screwing them in place. I started out using our regular drill and the screws were not going in the studs all the way and were pulling the board back. In this video, he suggests a drill driver and he is right. It made things MUCH easier. Lucky for us, our sweet neighbor let us borrow his.
Hanging backer board is pretty self explanatory. You cover the wall. :) We went all the way to the ceiling since my tile will go all the way up. Also, we checked the level periodically to make sure our walls were straight (even after all that checking we have one that is off a little).


The previously framed out niche is covered with backerboard as well.

After the boards were up, I filled and taped the seams. I used Mapei white thinset and a fiberglass mesh tape. Every single seam had to be done plus I put thin set over every screw.


BACKERBOARD MEETS DRYWALL:
One of the biggest frustrating factors about doing an update is old products (drywall, fittings, hardware) are not the same size as the new. Seriously, people....why can't you improve a product without changing the size and keep it easy on us DIYers. Way back when, during the kitchen renovation I had a BAD week because of issues like this. Read about it here--> That one time I almost got violent.
Our problem this time was the backer board is not the same thickness as our existing drywall so at the seam where they meet, there is a big difference.


One of the videos below addressed this problem. I filled and feathered out with drywall composite. It took a lot!


This stuff took 24 hours to dry. I filled and feathered. Let it dry over night. Sanded smooth in the morning then went back and filled again where needed. This process took a few days because of dry time.
Once it was all dry and sanded even, I used Ziissner oil based primer to seal it and make it a better surface for adhesion. Nothing sticks to drywall composite very well except primer. ALWAYS PRIME IT.
After that, I put 3 coats of the waterproofing product.
WATERPROOFING:
There are several waterproofing products out there. These products create a plastic coating so if the thin set cracks at the seam, the plastic coating will hold together and keep any water from seeping through. Red Guard and Mapei are popular because that is what is carried by Lowes and Home Depot. I honestly do not know if one brand is better than the other. I went with Mapei because I was already at Lowes on the day I needed to buy it and it was on sale, which made it about $10 cheaper than the Red Guard.

This stuff is easy to work with. It goes on just like paint. I used the cheap bristle paint brushes and a roller. I put 3 coats on every seam and screw except in the niche, I put 4. :) You do not have to cover every inch of the backer board with this stuff. Some tutorials I read, did. Some didn't. Its a personal choice. I didn't. Although after all the seams, screw holes and the edge seams were covered, it looks like I tried to put it all over. :)

It is now ready for tile which will be in another post. Things didn't go exactly to plan on the tile but such is life in a reno. We don't always get what we want...and I definitely didn't get what I wanted but it is still beautiful and I can't wait to see it all come together.
VIDEOS:
Great video about a shower enclave renovation.
See it here ---> https://www.youtube.com/watch?v=psf9cnYoVts
This Lowes video and the series it belongs to is good as well. https://www.youtube.com/watch?v=veXDnGSpOKo
One of my favorite bloggers recently updated her bathroom. She has tons of tutorials and info on her blog. Here is the link to her renovations page at her Key West home that includes bathroom tips and tutorials --> The Space Between Blog
Tomorrow I am going to shower you the tiled shower and update you on the budget.
SIDE NOTE: Since we live on the second floor and have access to all our plumbing in our garage, we did not have to install the new drain at the time of the shower pan installation. Most of you will have to hook the drain up to the plumbing when installing.
We cut a new hole for the new drain, laid a mortar bed, then put in the shower pan. Make sure the edges are level! The bottom of the pan is sloped for water drainage so if the pan edges are level, your pan floor should be sloping towards the drain.
PLASTIC WATERPROOFING:
Next came some plastic waterproofing. I have read and watched countless blogs, articles and videos about shower prep and tiling. Some people did this plastic barrier step. Some didn't. We decided it was a small cost for more water protection. Just in case something fails and water gets behind the backboard, this plastic barrier will carry the water down into the shower pan instead of water going into the wall. We decided to only put it 4 feet high since that is where most of the water is when you take a shower. The plastic is just stapled in a few spots to the studs then we used a crazy strong tape to adhere it to the shower pan lip.
BACKERBOARD:
I went with Hardi Plank cement board for the backer board material. Wear a mask and eyewear for sure when cutting this stuff. It makes a mess! We used a jig saw with super strong blades to make cuts.
SIDE NOTE: A drill driver makes things much easier when you are screwing them in place. I started out using our regular drill and the screws were not going in the studs all the way and were pulling the board back. In this video, he suggests a drill driver and he is right. It made things MUCH easier. Lucky for us, our sweet neighbor let us borrow his.
Hanging backer board is pretty self explanatory. You cover the wall. :) We went all the way to the ceiling since my tile will go all the way up. Also, we checked the level periodically to make sure our walls were straight (even after all that checking we have one that is off a little).
The previously framed out niche is covered with backerboard as well.
After the boards were up, I filled and taped the seams. I used Mapei white thinset and a fiberglass mesh tape. Every single seam had to be done plus I put thin set over every screw.
BACKERBOARD MEETS DRYWALL:
One of the biggest frustrating factors about doing an update is old products (drywall, fittings, hardware) are not the same size as the new. Seriously, people....why can't you improve a product without changing the size and keep it easy on us DIYers. Way back when, during the kitchen renovation I had a BAD week because of issues like this. Read about it here--> That one time I almost got violent.
Our problem this time was the backer board is not the same thickness as our existing drywall so at the seam where they meet, there is a big difference.
One of the videos below addressed this problem. I filled and feathered out with drywall composite. It took a lot!
This stuff took 24 hours to dry. I filled and feathered. Let it dry over night. Sanded smooth in the morning then went back and filled again where needed. This process took a few days because of dry time.
Once it was all dry and sanded even, I used Ziissner oil based primer to seal it and make it a better surface for adhesion. Nothing sticks to drywall composite very well except primer. ALWAYS PRIME IT.
After that, I put 3 coats of the waterproofing product.
WATERPROOFING:
There are several waterproofing products out there. These products create a plastic coating so if the thin set cracks at the seam, the plastic coating will hold together and keep any water from seeping through. Red Guard and Mapei are popular because that is what is carried by Lowes and Home Depot. I honestly do not know if one brand is better than the other. I went with Mapei because I was already at Lowes on the day I needed to buy it and it was on sale, which made it about $10 cheaper than the Red Guard.
This stuff is easy to work with. It goes on just like paint. I used the cheap bristle paint brushes and a roller. I put 3 coats on every seam and screw except in the niche, I put 4. :) You do not have to cover every inch of the backer board with this stuff. Some tutorials I read, did. Some didn't. Its a personal choice. I didn't. Although after all the seams, screw holes and the edge seams were covered, it looks like I tried to put it all over. :)
It is now ready for tile which will be in another post. Things didn't go exactly to plan on the tile but such is life in a reno. We don't always get what we want...and I definitely didn't get what I wanted but it is still beautiful and I can't wait to see it all come together.
VIDEOS:
Great video about a shower enclave renovation.
See it here ---> https://www.youtube.com/watch?v=psf9cnYoVts
This Lowes video and the series it belongs to is good as well. https://www.youtube.com/watch?v=veXDnGSpOKo
One of my favorite bloggers recently updated her bathroom. She has tons of tutorials and info on her blog. Here is the link to her renovations page at her Key West home that includes bathroom tips and tutorials --> The Space Between Blog
Tomorrow I am going to shower you the tiled shower and update you on the budget.

Wooden furniture has always been known for its durability, elegance and design, which lends an aristocratic look to a particular room, be it an office or a home... for more furnitures ( www.at-home.co.in )
ReplyDeleteWooden furniture has always been known for its durability, elegance and design, which lends an aristocratic look to a particular room, be it an office or a home... for more furnitures ( www.at-home.co.in )
ReplyDeleteSo far, so good. It’s good to know that you are done with the plumbing as well. The rest of the renovation should come along smoothly, as you have taken care of the hardest part of it. Now, you can focus on creating the master bath that you have always wanted. Good luck!
ReplyDeleteRoxanne Vaughn @ Total PLBG
It looks like you managed to do the plumbing properly, which is one of the most essential things in a bathroom. Anyway, it’s nice to know that you considered a lot of things beforehand, even the niche placement, in order to achieve that look. Thanks for sharing!
ReplyDeleteJohnny Hernandez @ Ripple Systems
I'm sure it looks great because you did the plumbing well. Thanks for sharing and for the great post!
ReplyDeleteI really loved reading your blog. It was very well authored and easy to understand. Unlike other blogs I have read which are really not that good.Thanks alot!
ReplyDeleteShower Heads
Very good written article. It will be supportive to anyone who utilizes it, including me. Keep doing what you are doing – can’r wait to read more posts. Best Shower Heads in 2018
ReplyDeletev
ReplyDeleteThis should help to put the metal back into place and prevent it from stripping. If this doesn't work, you may need to take out the retaining ring and use needle nose pliers to pull the ring out. Interested to know more about deck screws? find out here.
ReplyDelete