Showing posts with label Coffee Table. Show all posts

Friday, July 10, 2015

Friday Update ~ 07/10/2015

Y'all know when the blog gets quiet it means I am super busy.  The past two weeks have been exhausting but I have gotten so much done.


FURNITURE


I built custom end tables and a coffee table for a client.  They turned out great.  I will be doing an entire post on them soon but here is a quick pic of the coffee table in its new home looking gorgeous.


Wednesday, June 17, 2015

My Current Kitchen & Dining Room Crush

Y'all.  I have found a new favorite kitchen and dining room.    

Many of you know, I have an unhealthy strong obsession with the beach and water and the NEED to live there.  I love where we live now, but my dream is to live on a small, sleepy island with gorgeous blue water and white sand.  Blittle hears it all the time.  Running a bed and breakfast is part of that dream.  He can be a fishing guide and I can run the B&B and the dogs can have free run of the property and greet all the guests (in a perfect world)  I have it all figured out.  :)

I came across the show, Bloodline, several months ago and it is set in the Florida Keys (yes, please) and the family runs a pretty B&B (yes, again).  As usual, I got pulled in by the set.  I can't help but notice the design and furnishings on TV and movie sets.  Of course there are the popular ones and they are all gorgeous...

Wednesday, December 17, 2014

Friday, January 31, 2014

A few updates.

Y'all.  Someone please tell me where January went?!  Seriously!  What happened to it?

A few weeks ago I told y'all about my deal of the year so far.  The $75 Ikea couch.  It came with a white cover that I tried to dye.  There were some problems.  I thought there might be since the fabric was older and had some stains.  Dye is cheap so I wanted to at least try.  My goal was to get a light blue color but it ended up looking like splotchy denim.  Not really the look I was going for.

So yesterday, I ventured into Houston and got a new cover at Ikea.  A little more expensive than dye but the fabric is a better quality than the basic white cover and the color is perfect.

Saturday, January 25, 2014

DIY Coffee Table

So I know some of you are wondering where I have been all week.  And then there are some of you that probably didn't even realize I have been MIA.  :)


Well, I have been tired. And when I say tired I mean exhausted.  So exhausted I started to go to that crazy place in my mind.  Things started to shut down and quit and I felt like I was on drugs of some sort.  So exhausted I stopped doing push ups at bootcamp to lay in a dirty parking spot of the San Luis Resort because I could not lift myself again.  So exhausted that when I woke up to BLittle sending a work email on his phone from bed at 4am I had thoughts of smothering him with his pillow.

Tuesday, August 6, 2013

DIY Door Coffee Table

The first time I saw this idea I was on a plane reading through magazines I had bought while at the airport.  Airports have the best magazine selection!  Anyway, the picture was in one of the repurpose magazines and it was a complicated door coffee table with shelves added underneath and places to put the remotes.  I loved the idea but I wanted an option that was simpler.  I have seen several of these on Pinterest but none have good instructions. I am going to try to give clear instructions...keyword try... this might be "clear as mud" as my mom would say.


Tools & Supplies

  • Solid wood door
  • Skil saw or Jig saw
  • Kreg Jig
  • Kreg Jig Screws
  • Painters Tape
  • Saw Horses
  • Tape Measure
  • Pencil
  • Straight Edge
  • Sandpaper
  • Paint (optional)
  • Rust-oleum Spar Varnish


A few tips and recommendations:

ALWAYS be careful when using power tools!

It is important that the door is solid wood for the Kreg Jig Screws to hold the pieces together.

If you do not have a Kreg Jig, you can use wood glue and L brackets but the table will not be as sturdy.

You can make your door table as tall or as short as you would like.  The height does affect the width so have a plan BEFORE you cut.  I based mine on the height of my door (80-ish inches) and how long I wanted my table.

Always make your cuts with the PRETTY SIDE FACING DOWN.  Meaning, the side that will be seen as the table top should be facing down while using your saw.

Wrap the cut area with painters tape.  This will help keep the wood from fraying and splitting while making the cut.

Measure twice, cut once.  DUH!  I measure 3 or 4 times usually...just to make sure.

The top of the table sits on the legs so your overall table height is the leg height plus the door width.
DIY door coffee table tutorial, fisherman's wife furniture, projects


Let's get started!

I wanted my table 4 feet long or about.  After measuring my 48 inches, I had 32-ish inches of door left to use for the legs.  That was enough to make the overall height of the table about 18 inches which is a great coffee table height.   Once I got my plan, I started measuring and cutting.


I measured and marked 48 inches on the door.


Then, I wrapped the area with painters tape and measured my 48 inches onto the tape.  Using a straight edge (I used our long square) I drew a straight line on my tape.

DIY door coffee table tutorial, fisherman's wife furniture, projects
Measure, tape, remeasure.

Measure twice, cut once.  Draw line over tape then cut.

Using a saw with a laser makes cutting along your line easier.


After my first cut I had two sections.  The 4 foot section that will be the table top and the 32-ish inch section that will become the legs.

I took the 32-ish inch section and divided it by 2, taped, remeasured, and cut.

Measure, tape, remeasure then cut again.


After only 2 cuts, I have my 3 pieces (a top and 2 legs).  I used some 220 grit sand paper to smooth the edges where I made my cuts before I put them together. 

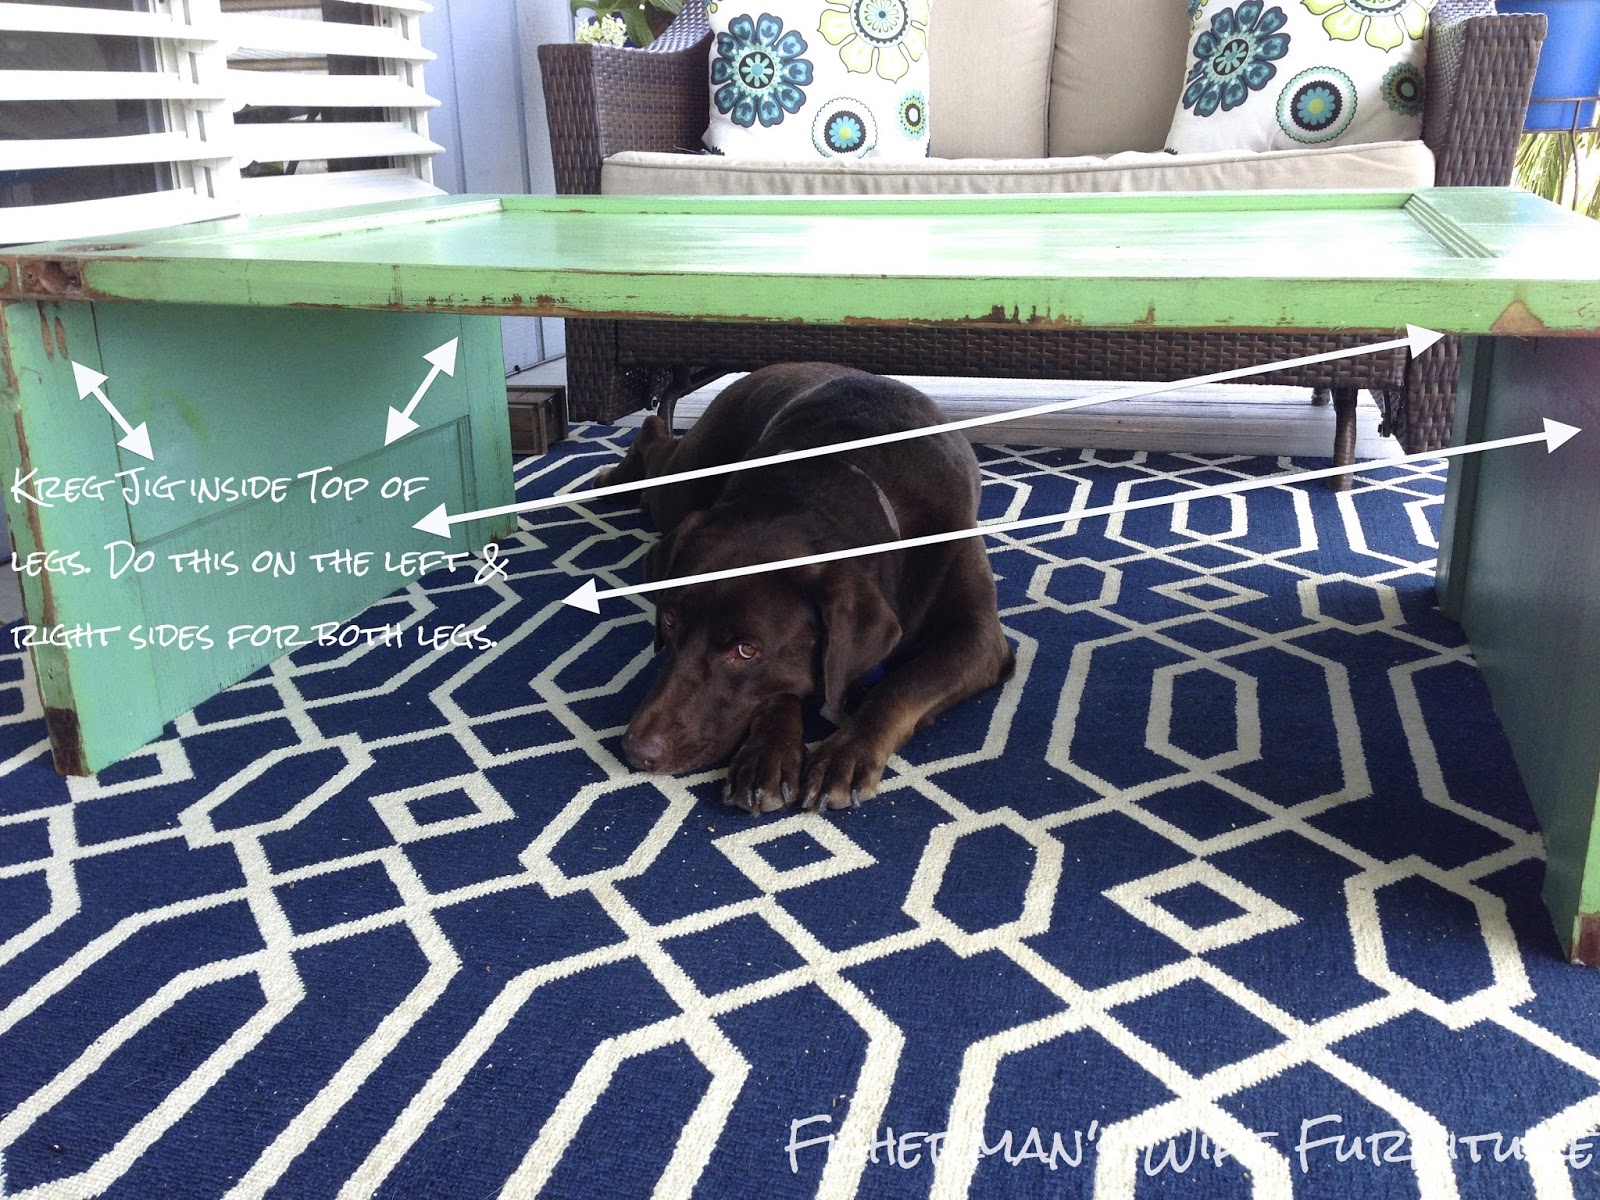
Now to use the Kreg Jig.  Set the drill and Kreg Jig based on the door's width.  The LEGS are screwed into the top so all the Kreg Jig drills will be on the TOP, INSIDE of the LEGS.  There will be 4 sets of drills on the LEGS.  


DIY door coffee table tutorial, fisherman's wife furniture, projects
I forgot to take a picture before I put the table together...OOPS.
This one gives you an idea of what I am talking about.

Once I drilled the legs, it was time to put together.  Again, I forgot to take a pictures of this step...sorry...I am working on taking more pictures while I work...I just forget.  I placed the coffee table top pretty side DOWN on a blanket so it wouldn't get hurt.  I then screwed the legs into the top being careful to make sure my pretty sides are facing out and everything was lined up.  


When the legs are screwed in, the table is pretty much done.  I sanded any rough edges and wiped the table clean. It is up to you to paint or clear coat.  I loved the color of my door so I didn't paint but I did use Rust-oluem Spar Varnish in Semi Gloss to clear coat since my table is going to live outside.


This makes for easy clean up and protects the paint (who knows how old or what kind it is) from bubbling and peeling due to moisture.  It also keeps the wood from soaking in moisture which protects it from rot.

After my clear coat was dry, I WAS DONE!


DIY door coffee table tutorial, fisherman's wife furniture, projects, houston, galveston


Clear as mud, right?!  Good luck for those of you who try it!  I promise to have better pictures on my next tutorial :)  And a better overall tutorial on my next tutorial :)

Monday, August 5, 2013

Outdoor Seating


Happy Monday!  I hope everyone had a great weekend.  Today I am going to show you my progress on our outdoor seating area.

Lets begin with what we started with when we first moved in.

Scary chairs left by the previous owners.  The cushions were melting so we threw them away and sat on the chairs without.  As you can imagine, this was not comfortable.  The side table planter is ours as well as the hydrangeas.  Just a sad space.


We spend a lot of time on the deck.  Almost all our free time.  Drinking our morning coffee, afternoons, evenings, whenever we can.  Luckily we knew to only look at houses that have East facing (more southeast but they say its east) decks so the afternoon, and very HOT, Texas sun sets on the front of the house.   Our deck only gets sun in the morning until about 10 AM and then the sun is high enough that the roof shades the deck.  On top of that, we get the breeze from the beach (most days). So even though it is 97 degrees in the sun right now, I am sitting on my shaded deck typing this and not sweating!  Close to a miracle in Texas.   I can sit on my deck pretty much anytime of day right now and be comfortable.  There have been a fews days where the mornings were so calm and there was no breeze so it got hot but most of the time, we have a good wind to keep things cool.

Comfortable furniture and a cozy space is important to us since we do spend so much time outside but comfortable, pretty outdoor furniture is not cheap.  The ones that are cheap usually look cheap.  After shopping around my usual places, Lowes, Home Depot, Target, etc. I didn't find anything I really liked so I went to the internet.  I buy online ALL the time.  So much so, I have my credit card number and info memorized...don't want to have to go dig it out of my purse while shopping and drinking my coffee on the deck :)  Having said that, I have reservations ordering furniture online.  It can be gorgeous and the right size and color but then you get it in and it is the most uncomfortable thing.  I like to give my furniture a test sit. Unfortunately, that wasn't possible this time and I had to order since there is a much larger selection online.

This is what I ended up with:


If you look closely, you can see Sabine's legs under the table.
She loves to get in her little cave.
See my Jaxson laying up against the couch?!

He loves to look out at the water.

With his head hanging off the deck.


I found my sofa glider and club chairs (only one is in the picture but they come as a set) at Target.com.  When I ordered them they were on sale so I did not pay the price listed right now. I suggest waiting for another sale.

My rug is an outdoor 7x10 from overstock.com.  They have tons that are similar and in the same price range.  This one only cost $168 and that includes taxes and shipping!

The pillows on the glider were left behind by the previous owners.  They had Hobby Lobby tags on them but who knows how long ago they were purchased.  They are not made of outdoor material so I sprayed them with starch and hopefully they will hold out for a year or two.

The coffee table is a door was also left by the previous owners.  I have done this before:

This one I added doorknob feet to make it taller.  It will be used as a kids
table in a child's room.
As soon as I saw the green door I knew what I was going to do to it.  This is a super easy project!  It requires only a couple of tools and a few steps.   I will post the full tutorial and tips with pictures tomorrow so check back.

I hope everyone has a productive day!