
Tools & Supplies
- Solid wood door
- Skil saw or Jig saw
- Kreg Jig
- Kreg Jig Screws
- Painters Tape
- Saw Horses
- Tape Measure
- Pencil
- Straight Edge
- Sandpaper
- Paint (optional)
- Rust-oleum Spar Varnish
A few tips and recommendations:
ALWAYS be careful when using power tools!
It is important that the door is solid wood for the Kreg Jig Screws to hold the pieces together.
If you do not have a Kreg Jig, you can use wood glue and L brackets but the table will not be as sturdy.
You can make your door table as tall or as short as you would like. The height does affect the width so have a plan BEFORE you cut. I based mine on the height of my door (80-ish inches) and how long I wanted my table.
Always make your cuts with the PRETTY SIDE FACING DOWN. Meaning, the side that will be seen as the table top should be facing down while using your saw.
Wrap the cut area with painters tape. This will help keep the wood from fraying and splitting while making the cut.
Measure twice, cut once. DUH! I measure 3 or 4 times usually...just to make sure.
The top of the table sits on the legs so your overall table height is the leg height plus the door width.

Let's get started!
I wanted my table 4 feet long or about. After measuring my 48 inches, I had 32-ish inches of door left to use for the legs. That was enough to make the overall height of the table about 18 inches which is a great coffee table height. Once I got my plan, I started measuring and cutting.
I measured and marked 48 inches on the door.
Then, I wrapped the area with painters tape and measured my 48 inches onto the tape. Using a straight edge (I used our long square) I drew a straight line on my tape.
 |
| Measure, tape, remeasure. |
 |
| Measure twice, cut once. Draw line over tape then cut. |
 |
| Using a saw with a laser makes cutting along your line easier. |
After my first cut I had two sections. The 4 foot section that will be the table top and the 32-ish inch section that will become the legs.
I took the 32-ish inch section and divided it by 2, taped, remeasured, and cut.
 |
| Measure, tape, remeasure then cut again. |
After only 2 cuts, I have my 3 pieces (a top and 2 legs). I used some 220 grit sand paper to smooth the edges where I made my cuts before I put them together.
Now to use the Kreg Jig. Set the drill and Kreg Jig based on the door's width. The LEGS are screwed into the top so all the Kreg Jig drills will be on the TOP, INSIDE of the LEGS. There will be 4 sets of drills on the LEGS.
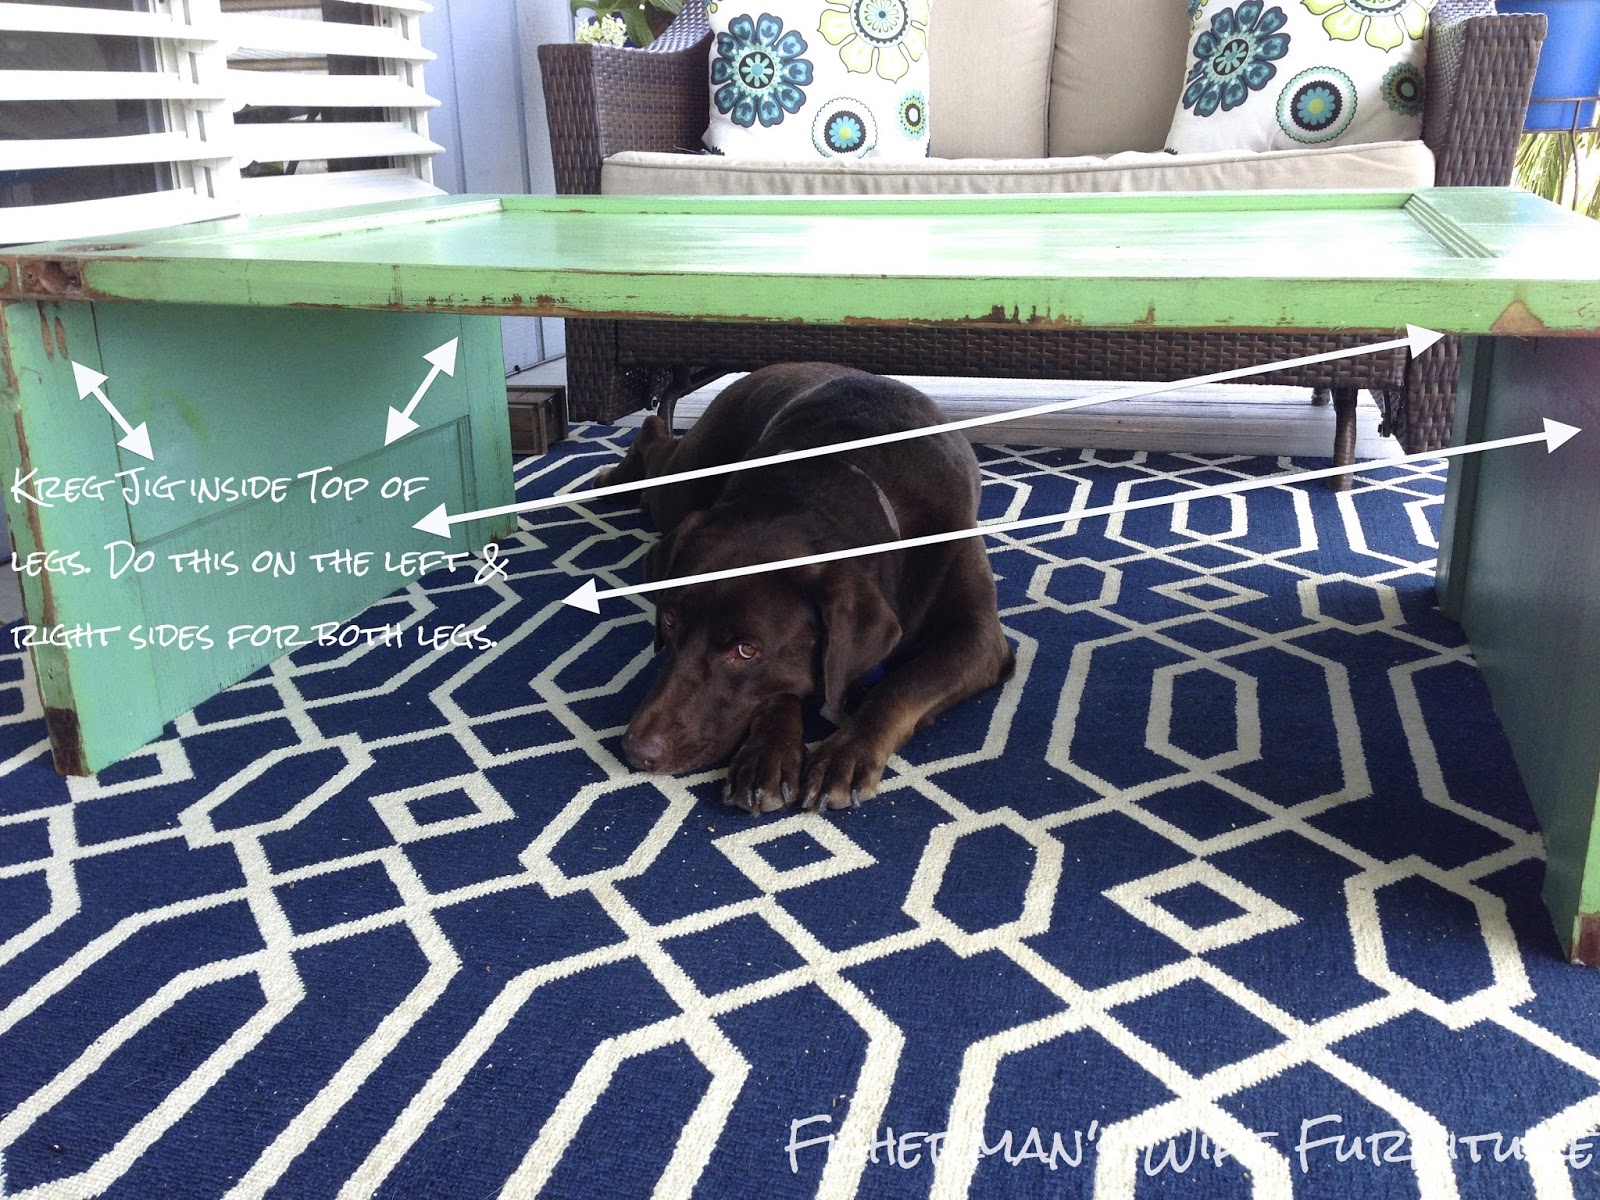 |
| I forgot to take a picture before I put the table together...OOPS. This one gives you an idea of what I am talking about. |
Once I drilled the legs, it was time to put together. Again, I forgot to take a pictures of this step...sorry...I am working on taking more pictures while I work...I just forget. I placed the coffee table top pretty side DOWN on a blanket so it wouldn't get hurt. I then screwed the legs into the top being careful to make sure my pretty sides are facing out and everything was lined up.

When the legs are screwed in, the table is pretty much done. I sanded any rough edges and wiped the table clean. It is up to you to paint or clear coat. I loved the color of my door so I didn't paint but I did use Rust-oluem Spar Varnish in Semi Gloss to clear coat since my table is going to live outside.

This makes for easy clean up and protects the paint (who knows how old or what kind it is) from bubbling and peeling due to moisture. It also keeps the wood from soaking in moisture which protects it from rot.
After my clear coat was dry, I WAS DONE!


Clear as mud, right?! Good luck for those of you who try it! I promise to have better pictures on my next tutorial :) And a better overall tutorial on my next tutorial :)
Amazing talent you have , taking plain things and turning them into beautful functional pieces . Your home looks amazing and the setting is so inviting ........Best of luck to you and your family !
ReplyDeleteThanks, Mrs. Janko!
ReplyDeleteGreat efforts put it to find the list of articles which is very useful to know, Definitely will share the same to other forums.
ReplyDeleteI also love to sit on drafting chair that has Diy door coffee table. So I decide to Buy new drafting chair from this website and now search for buying diy coffee table for my study room.
ReplyDeleteOh Great. I love to read that. But if your are pregnant then must read this post.
ReplyDeletechair for pregnant women
This story is very important. It is cool that you describe.
ReplyDeleteManufacturer of industrial fans
Blue Star Combined Refrigerator
ReplyDeleteThis comment has been removed by the author.
ReplyDeleteKeeping your industrial operations compliant with pollution norms in Uttar Pradesh is crucial to avoid penalties and ensure environmental safety. Many businesses struggle with obtaining timely UPPCB consents and adhering to regulations. Agile Regulatory provides expert guidance to simplify the pollution control compliance process and secure necessary licenses efficiently. Their team ensures that your company meets legal standards without unnecessary delays.
ReplyDelete