Wednesday, August 21, 2013

DIY Refrigerator Enclosure

January 2016 Update: Visit our new blog www.brianandkaylor.com  


Today I am going to show you my refrigerator enclosure.


Just to remind you, the previous refrigerator was big, white, bulky and hanging out at the end of the cabinets.


As soon as I knew we were buying the house the wheels were turning and I started researching on how to fix the fridge problem.  There had to be a way to make it look like it belonged in the kitchen and not just shoved at the end of the cabinets.  I saw several people on the blogosphere built enclosures for their refrigerators and added it to the current cabinetry.  GENIUS!!

  Here is an example of what I am talking about.

Just add a box...simple right.  BAHAHA!!!!!   I should know better.  The problem with a project like this is no matter how good the tutorial is or detailed the pictures are, each situation is different.  My cabinets are a different size, my refrigerator is a different size (I purchased a counter depth), my ceiling height is different....you get my point.  I had to come up with a strategy for my situation.  It wasn't too bad but it did not turn out exactly as planned.

My first problem was most of the tutorials had a set of cabinets to use above the fridge that matched the current cabinets.  This made it look like the box was built with the cabinets.   I tried to take my current ones down and they wouldn't  budge.  The cabinets were built off of each neighboring cabinet.  Meaning, I coudn't get the cabinets above the fridge down without hurting the ones next to it so I had to scratch that idea.   Since I could not remove the cabinets above the fridge I had to build the box around them which complicated things.  I decided to cover the cabinet and put a shelf over the fridge instead.  I now have a home for my cookbooks.   Here are some progress shots.


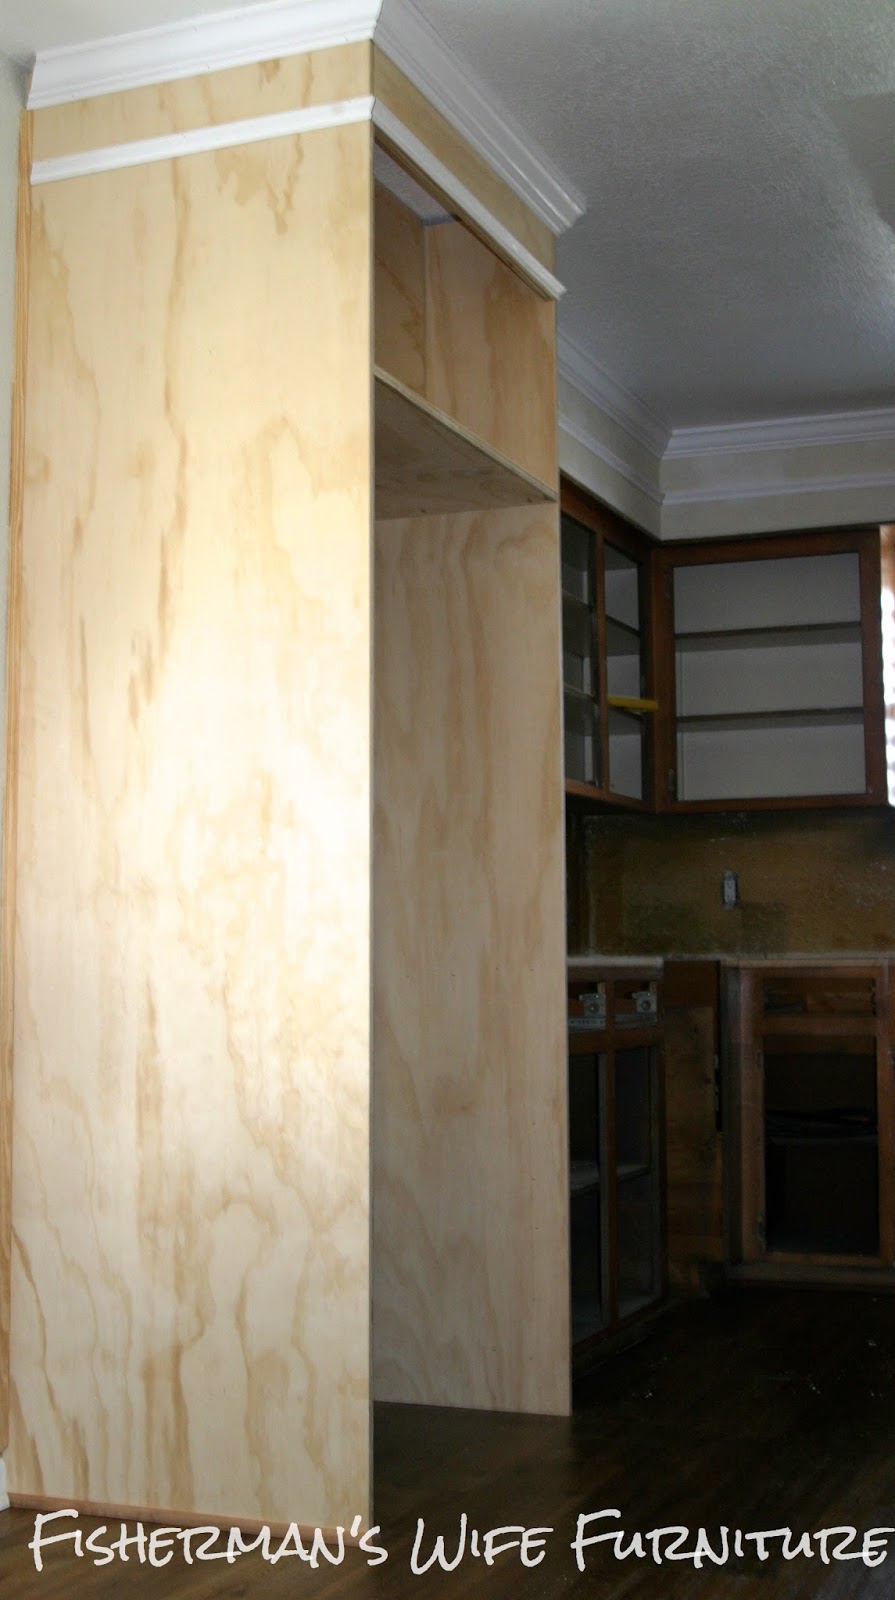
The moldings on the fur down are continued around the new enclosure.  Read about the space of the cabinets here.

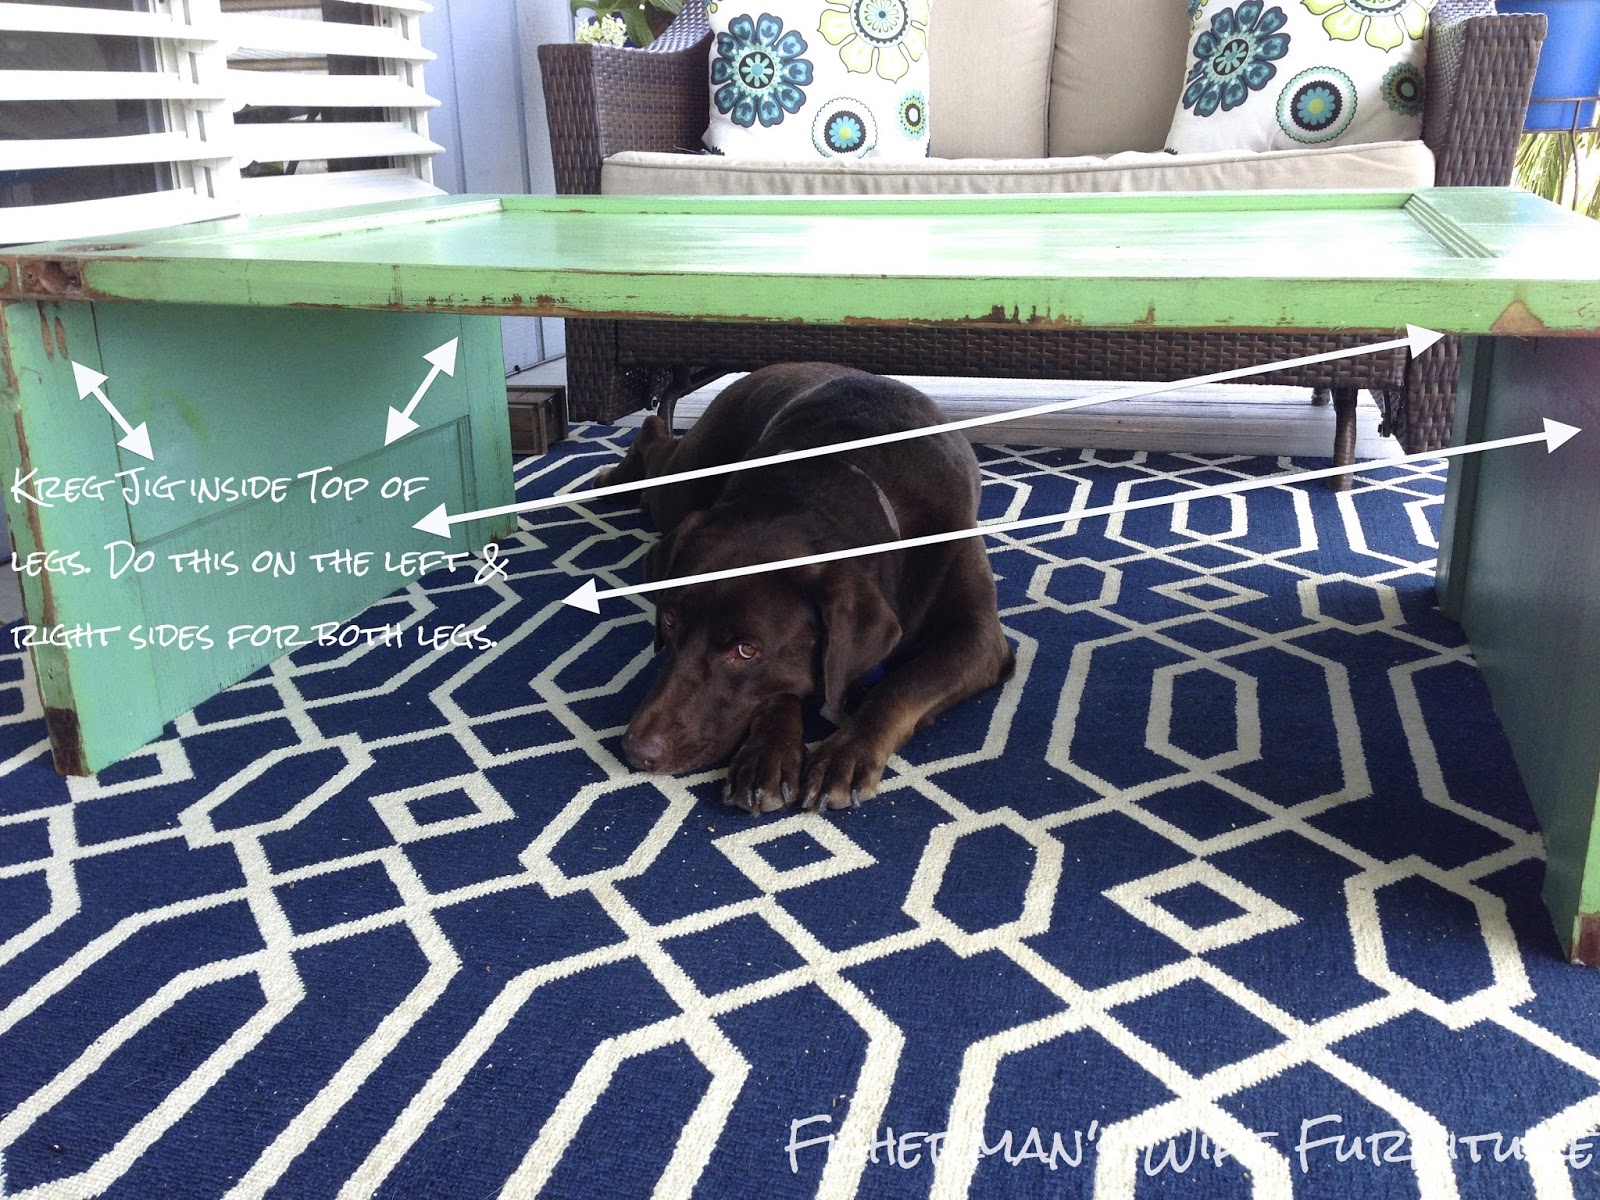
I used my handy dandy Kreg Jig to make all the connections hidden.  This also helped with the braces we put along the back and gave me a way to secure the box into the floor.  For me that was the scariest part....drilling holes into my new flooring.  Talk about a measure 10 times, drill once kind of situation.


Here are the after pictures and yes I still have the stickers on my fridge.  It has been moved around a lot so I have tried to protect it as much as possible.  Also, I can't find my cookbooks.  At the moment, they are lost in the hot steamy abyss also known as the POD. :)


 custom furniture Galveston Houston Tx, white kitchen, painted kitchen cabinets, DIY refrigerator enclosure


I. LOVE. IT.  Other than the paint color, buying a counter depth fridge and having it boxed in has totally changed the room.  It feels so much bigger!  Thank you to my husband for trusting me with this idea and helping me with it.  Sometimes I can tell he is not so sure about my crazy ideas (not sure why) but trusts me anyway and helps me when I ask for it.  Thanks, babe!


UPDATE:


Click here to see all the before and after pictures of the kitchen.


This post was a runner up in One Project Closer's The Better Half Before & After contest!  Pretty Handy Girl was the Co-Host that week.  Check out the winner and other runner-ups here!

he Humble Brag Supporting Habitat for Humanity

Monday, August 19, 2013

Kitchen Inspiration

Happy Monday!

I think I can finally see the light at the end of the tunnel in the kitchen.  Over the past month I have mentioned the kitchen several times but have decided to not post any updated pictures yet. I thought I'd keep y'all on the edge of your seats for a while ;)   Here are a few reminders of what we started with and what we want to change.


The kitchen is getting a total makeover and everything will be new or updated. 
  • All appliances (which I talked about here)
  • Cabinets
  • Floor
  • Countertops
  • Backsplash
  • Light fixtures
  • Hardware
  • Sink & Faucet
  • Plus some additions


I like the casual feel in my home.  My husband and I are not fancy people :)   Below are a few overall concepts I love and they show the look/feel I am going for.  I have a Waterfront House board on Pinterest that has tons of ideas, furniture, and fixtures I want to use in the house.  Go check it out!


My favorite inspiration picture is an amazing kitchen on House of Turquoise (LOVE her blog!).  I saw it a long time ago and immediately bookmarked it.  It's a tour of the entire home!  She spreads the tour over 5 days and the kitchen is on day 3.  You must check it out (click here to go to Day 1).  I have always gone back to it as a reference.  This might be the closest thing to my dream home.  I LOVE, LOVE, LOVE it!   As for the kitchen, I love the bright, airy feel, the Vatrazzo countertops, and the subway tile backsplash.  I even love the lights over the island.  A few weeks ago I talked about appropriate and inappropriate lighting here.  These are borderline inappropriate for me but I think they would pass.


A while back, The Cottage Market posted about neutral kitchens.  I really liked this one.  Again, with the white cabinets, bright, airy, subway tile.


I saw this on Pinterest and instantly feel in love with the cottage look.


Choosing our cabinet color was easy, I already have a favorite white,  but the other details took a little more discussion and research.  With any remodel or upgrade sometimes you do not get all of your first choices and sometimes things don'e work out the way you want.  There was some compromising and going back to square one but it has all worked out so far and is coming together.

I will be posting about some of the details we added over the next few days.

Have a great week everyone!

Friday, August 16, 2013

Remodeler's Fatigue

Anybody else suffer from this?  This week I self diagnosed.  I definitely have "Remodeler's Fatigue".  Its a real thing people!  I did not make this stuff up!

We all know I don't mind hard work, or being dusty from sanding, or being covered in paint but I am one of those people that HAVE to have rest and good sleep.  I do not function without it.  It has been that way for as long as I can remember.  I could have homework, a test to study for, a deadline, whatever...doesn't matter.  If I am sleepy,  I am going to bed.  My brain stops working correctly if I don't.  Now that we are 7 weeks into the remodel, fatigue is setting in.  It doesn't matter how much sleep I get, I am still tired.  I feel overwhelmed all the time because I never get away from the house and I am constantly reminded of how much I have to do.  I never really get to relax.  Right now, the detailed work left in the kitchen is equivalent to running a marathon in August.  Knowing that we are close to finishing the kitchen is keeping me going but progress has definitely slowed down.

I took a day off yesterday to spend time with my best friend/sister.  I call her my sister because we have been friends since 1st grade.  Now we are in our 30's and I can't imagine my life without her and her family.  She lives north of Houston and it takes about an hour to get to my house (no more plane rides to visit each other!!!!!!)  We spent the day in Galveston with the kids.  It was so nice to not be in the house and constantly be reminded how much work I have to do.  Here are a few pictures from the day.


First we visited Seawolf Park.  There is a battleship and submarine that you get to go in!  It really is cool...and scary.  I went there when I was a child but things feel a lot smaller now that I am an adult.  Very tight squeeze in some areas.  My friend is 32 weeks pregnant and at one point there were only a few inches between her belly and the wall.


Then we went to lunch on the seawall and spent a few hours at the beach.


We went back to the house to relax and get ready for dinner.  Sweet Bretton fell asleep on the deck while the girls played with the ducks and dogs. 


We had so much fun!

Now its time to get back to work on that kitchen.  It is primed and ready for paint!!!!  First coat is going on today.  Just the primer has made the space feel bigger and more opened.  I can't wait to see how its going to feel when its finished!

I hope everyone has a great weekend.  Brian and I are going to work on the kitchen and getting our garage organization/work benches set up.  Busy, busy, busy.  I am fighting my fatigue with vitamin B, trying to sleep a little more, and not working myself to death everyday. Hopefully it will get me through and get this kitchen done sooner than later.


Friday, August 9, 2013

Entertainment Center

I don't have a lot of time today so this is a super short post.  

A few months ago I posted about a dresser I turned into an entertainment center.  (You can read about it here and here)  I finally have it out of storage and set up in my new living room.  It is perfect.  I'll post a tutorial in a few days but for now, here are some pictures of it in its new home.


Tuesday, August 6, 2013

DIY Door Coffee Table

The first time I saw this idea I was on a plane reading through magazines I had bought while at the airport.  Airports have the best magazine selection!  Anyway, the picture was in one of the repurpose magazines and it was a complicated door coffee table with shelves added underneath and places to put the remotes.  I loved the idea but I wanted an option that was simpler.  I have seen several of these on Pinterest but none have good instructions. I am going to try to give clear instructions...keyword try... this might be "clear as mud" as my mom would say.


Tools & Supplies

  • Solid wood door
  • Skil saw or Jig saw
  • Kreg Jig
  • Kreg Jig Screws
  • Painters Tape
  • Saw Horses
  • Tape Measure
  • Pencil
  • Straight Edge
  • Sandpaper
  • Paint (optional)
  • Rust-oleum Spar Varnish


A few tips and recommendations:

ALWAYS be careful when using power tools!

It is important that the door is solid wood for the Kreg Jig Screws to hold the pieces together.

If you do not have a Kreg Jig, you can use wood glue and L brackets but the table will not be as sturdy.

You can make your door table as tall or as short as you would like.  The height does affect the width so have a plan BEFORE you cut.  I based mine on the height of my door (80-ish inches) and how long I wanted my table.

Always make your cuts with the PRETTY SIDE FACING DOWN.  Meaning, the side that will be seen as the table top should be facing down while using your saw.

Wrap the cut area with painters tape.  This will help keep the wood from fraying and splitting while making the cut.

Measure twice, cut once.  DUH!  I measure 3 or 4 times usually...just to make sure.

The top of the table sits on the legs so your overall table height is the leg height plus the door width.
DIY door coffee table tutorial, fisherman's wife furniture, projects


Let's get started!

I wanted my table 4 feet long or about.  After measuring my 48 inches, I had 32-ish inches of door left to use for the legs.  That was enough to make the overall height of the table about 18 inches which is a great coffee table height.   Once I got my plan, I started measuring and cutting.


I measured and marked 48 inches on the door.


Then, I wrapped the area with painters tape and measured my 48 inches onto the tape.  Using a straight edge (I used our long square) I drew a straight line on my tape.

DIY door coffee table tutorial, fisherman's wife furniture, projects
Measure, tape, remeasure.

Measure twice, cut once.  Draw line over tape then cut.

Using a saw with a laser makes cutting along your line easier.


After my first cut I had two sections.  The 4 foot section that will be the table top and the 32-ish inch section that will become the legs.

I took the 32-ish inch section and divided it by 2, taped, remeasured, and cut.

Measure, tape, remeasure then cut again.


After only 2 cuts, I have my 3 pieces (a top and 2 legs).  I used some 220 grit sand paper to smooth the edges where I made my cuts before I put them together. 

Now to use the Kreg Jig.  Set the drill and Kreg Jig based on the door's width.  The LEGS are screwed into the top so all the Kreg Jig drills will be on the TOP, INSIDE of the LEGS.  There will be 4 sets of drills on the LEGS.  


DIY door coffee table tutorial, fisherman's wife furniture, projects
I forgot to take a picture before I put the table together...OOPS.
This one gives you an idea of what I am talking about.

Once I drilled the legs, it was time to put together.  Again, I forgot to take a pictures of this step...sorry...I am working on taking more pictures while I work...I just forget.  I placed the coffee table top pretty side DOWN on a blanket so it wouldn't get hurt.  I then screwed the legs into the top being careful to make sure my pretty sides are facing out and everything was lined up.  


When the legs are screwed in, the table is pretty much done.  I sanded any rough edges and wiped the table clean. It is up to you to paint or clear coat.  I loved the color of my door so I didn't paint but I did use Rust-oluem Spar Varnish in Semi Gloss to clear coat since my table is going to live outside.


This makes for easy clean up and protects the paint (who knows how old or what kind it is) from bubbling and peeling due to moisture.  It also keeps the wood from soaking in moisture which protects it from rot.

After my clear coat was dry, I WAS DONE!


DIY door coffee table tutorial, fisherman's wife furniture, projects, houston, galveston


Clear as mud, right?!  Good luck for those of you who try it!  I promise to have better pictures on my next tutorial :)  And a better overall tutorial on my next tutorial :)