

Showing posts with label Tutorial. Show all posts
Showing posts with label Tutorial. Show all posts
Tuesday, June 2, 2015
How to Cut a Screw
After several years of furniture and home updates, I have finally taken the time to learn how to cut a screw. I have tons of them. They come with original hardware and new hardware packages usually have two screw sizes included. I have kept most of the screws I come across, new and old. Problem is making them the length I need them. Until now.
Thursday, April 2, 2015
How to Remove Pressure Gauges from Shower Fixtures
Hey, hey, everyone! Great news. We fixed the hot water issue and have been using the shower! LOVE. IT. Obviously, we still have a lot of work to finish the entire bathroom but other than the glass door being installed, the shower is done!
Today, I want to share with you how I removed the pressure gauges from our new shower fixtures.

Today, I want to share with you how I removed the pressure gauges from our new shower fixtures.
Friday, June 27, 2014
A Year Later....
Today marks one year in our waterfront cottage. June 27, 2013 was the first night we spent in the house and the next day we rented a jack hammer and started the updates. It has been 12 months of work. A LOT OF WORK.
Blittle and I were sitting on the dock the other evening baffled by how we did so much in a year. No wonder I am so tired! Once I am done with the dock furniture, we are taking a break from DIY for a while. People have repeatedly said, it doesn't have to all get done right now. I know this. But I want it done right now. When I am home there are constant reminders of what needs to be done and I have a hard time ignoring them. I get anxious. If I am not crossing things off the to do list, I feel like I am wasting time. The past month has shown me it is time for a break. My body istired, exhausted, drained, done...I can't really find a word to describe the level of physical, mental and emotional exhaustion that I am on. It is time to rest and slow down a little.
The next few months are for working on client furniture and saving money. There are some HUGE projects on the list for 2015!
Blittle and I were sitting on the dock the other evening baffled by how we did so much in a year. No wonder I am so tired! Once I am done with the dock furniture, we are taking a break from DIY for a while. People have repeatedly said, it doesn't have to all get done right now. I know this. But I want it done right now. When I am home there are constant reminders of what needs to be done and I have a hard time ignoring them. I get anxious. If I am not crossing things off the to do list, I feel like I am wasting time. The past month has shown me it is time for a break. My body is
The next few months are for working on client furniture and saving money. There are some HUGE projects on the list for 2015!
Thursday, June 26, 2014
Knock Off Decor Feature
Happy rainy Thursday! The weather here is wet! Rain, rain and more rain. And rain is in the forecast until Sunday. Yesterday, I was on the island for bootcamp and saw a tiny waterspout off the beach.

Today, my DIY Restoration Hardware Planter is featured at Knock Off Decor!

I LOVE her site. There are amazing knock off tutorials from some of my favorite stores. Places like Pottery Barn, Restoration Hardware, and Anthropologie.
Be sure to visit Knock Off Decor and see all the great tutorials. You might find your next project!
Click here to see my feature.

![]()
![]()
![]()


Today, my DIY Restoration Hardware Planter is featured at Knock Off Decor!
I LOVE her site. There are amazing knock off tutorials from some of my favorite stores. Places like Pottery Barn, Restoration Hardware, and Anthropologie.
Be sure to visit Knock Off Decor and see all the great tutorials. You might find your next project!
Click here to see my feature.

Tuesday, May 13, 2014
DIY Restoration Hardware Planter Tutorial
I know. I know. This post should have been published on Friday. It just never happened. My fault. I hope everyone had a great weekend!
And here is the tutorial.
Last week, I showed you my DIY Restoration Hardware Planters.

And here is the tutorial.
Last week, I showed you my DIY Restoration Hardware Planters.
Thursday, April 17, 2014
Polishing Brass Tutorial
In yesterday's post, Brass is Back, I showed y'all a few accessories I have inherited recently. Both are brass pieces and were tarnished. I cleaned and polished them to the shiny, brass they were meant to be.


Thursday, January 16, 2014
DIY Dining Room Table Tutorial
Happy Friday Eve! Today I am going to tell y'all about how I built my table that I showed you in yesterday's post.
This is a what I am calling a semi-tutorial. The Ana White plans I used are good so you can download and/or print them out here. This post tells you about some details that aren't in the plans and what I added or did differently.
This is a what I am calling a semi-tutorial. The Ana White plans I used are good so you can download and/or print them out here. This post tells you about some details that aren't in the plans and what I added or did differently.
Tuesday, October 15, 2013
Painting Kitchen Cabinets

When we bought the house I was really worried about the kitchen. There is no where to expand to make it bigger. There is no space to really change the layout. We were stuck with the U-shape kitchen. The space was really dark. There is only the one little window over the sink and all other natural light comes from the bay window in the dining area. I knew I had my work cut out for me which is scary when you are deciding to buy a home. But I knew I could transform the room and took on the challenge. One of the most important choices for the room was paint color.
Thursday, October 3, 2013
Glass Tile Backsplash
January 2016 Update: Visit our new blog www.brianandkaylor.com
Hi all! I can't believe it is already Thursday. This week has flown by.
I finished up our tile this week. Tiling is a lot like painting....many stages and waiting for things to dry. I am not going to write a tutorial on tile because there are so many amazing ones out there on the blogosphere and I don't think I can write a better one. My favorite tutorial is from Pretty Handy Girl. She even posted a video. Check out Part 1 here and Part 2 here.
I am going to tell you a few things I did that wasn't on a tutorial or I figured out as I went. This was my first time to tile so I learned a lot!
- Glass tile MUST have a glass certified tile blade
We rented a wet saw and I asked the guys at the store what kind of blade it had. They all assured me it would cut glass even though it wasn't a "glass tile blade". They had some name for the the blade I had not heard of and said it was the best. Alrighty, I guess they know what they are talking about. Well....they don't. At least not with this. We used a the sample tile to test it and the blade tried to eat my expensive tile. Of course the rental store closed at noon on Saturdays and was closed by the time we tested the tile. We went to HD and Lowes and neither one of them had a 10 in glass blade for the saw so we were stuck. To make a long, dramatic story short, we ended up buying a wet saw. It was about $50/day to rent a saw and on that day the rental was useless. Even if we found a glass blade for it we would need it for a few more days just for the backsplash project. A small new one at HD was $130 and they had a glass certified blade for it. We will be tiling our bathrooms over the next year so we felt it was a good investment compared to renting. Here is the one we bought.
Friday, September 13, 2013
DIY Butcher Block Countertops
January 2016 Update: Visit our new blog www.brianandkaylor.com
In yesterday's post I talked about how we came to the decision to have butcher block countertops. (Read about it here) Today I am going to tell you how we did it.

This is a really long post but if you are considering doing butcher block countertops yourself, it is worth the time.
In yesterday's post I talked about how we came to the decision to have butcher block countertops. (Read about it here) Today I am going to tell you how we did it.
This is a really long post but if you are considering doing butcher block countertops yourself, it is worth the time.
Tuesday, August 6, 2013
DIY Door Coffee Table
The first time I saw this idea I was on a plane reading through magazines I had bought while at the airport. Airports have the best magazine selection! Anyway, the picture was in one of the repurpose magazines and it was a complicated door coffee table with shelves added underneath and places to put the remotes. I loved the idea but I wanted an option that was simpler. I have seen several of these on Pinterest but none have good instructions. I am going to try to give clear instructions...keyword try... this might be "clear as mud" as my mom would say.
Tools & Supplies
A few tips and recommendations:
ALWAYS be careful when using power tools!
It is important that the door is solid wood for the Kreg Jig Screws to hold the pieces together.
If you do not have a Kreg Jig, you can use wood glue and L brackets but the table will not be as sturdy.
You can make your door table as tall or as short as you would like. The height does affect the width so have a plan BEFORE you cut. I based mine on the height of my door (80-ish inches) and how long I wanted my table.
Always make your cuts with the PRETTY SIDE FACING DOWN. Meaning, the side that will be seen as the table top should be facing down while using your saw.
Wrap the cut area with painters tape. This will help keep the wood from fraying and splitting while making the cut.
Measure twice, cut once. DUH! I measure 3 or 4 times usually...just to make sure.
The top of the table sits on the legs so your overall table height is the leg height plus the door width.

Let's get started!
I wanted my table 4 feet long or about. After measuring my 48 inches, I had 32-ish inches of door left to use for the legs. That was enough to make the overall height of the table about 18 inches which is a great coffee table height. Once I got my plan, I started measuring and cutting.
I measured and marked 48 inches on the door.
After my first cut I had two sections. The 4 foot section that will be the table top and the 32-ish inch section that will become the legs.
I took the 32-ish inch section and divided it by 2, taped, remeasured, and cut.

When the legs are screwed in, the table is pretty much done. I sanded any rough edges and wiped the table clean. It is up to you to paint or clear coat. I loved the color of my door so I didn't paint but I did use Rust-oluem Spar Varnish in Semi Gloss to clear coat since my table is going to live outside.

This makes for easy clean up and protects the paint (who knows how old or what kind it is) from bubbling and peeling due to moisture. It also keeps the wood from soaking in moisture which protects it from rot.
After my clear coat was dry, I WAS DONE!


Tools & Supplies
- Solid wood door
- Skil saw or Jig saw
- Kreg Jig
- Kreg Jig Screws
- Painters Tape
- Saw Horses
- Tape Measure
- Pencil
- Straight Edge
- Sandpaper
- Paint (optional)
- Rust-oleum Spar Varnish
A few tips and recommendations:
ALWAYS be careful when using power tools!
It is important that the door is solid wood for the Kreg Jig Screws to hold the pieces together.
If you do not have a Kreg Jig, you can use wood glue and L brackets but the table will not be as sturdy.
You can make your door table as tall or as short as you would like. The height does affect the width so have a plan BEFORE you cut. I based mine on the height of my door (80-ish inches) and how long I wanted my table.
Always make your cuts with the PRETTY SIDE FACING DOWN. Meaning, the side that will be seen as the table top should be facing down while using your saw.
Wrap the cut area with painters tape. This will help keep the wood from fraying and splitting while making the cut.
Measure twice, cut once. DUH! I measure 3 or 4 times usually...just to make sure.
The top of the table sits on the legs so your overall table height is the leg height plus the door width.

Let's get started!
I wanted my table 4 feet long or about. After measuring my 48 inches, I had 32-ish inches of door left to use for the legs. That was enough to make the overall height of the table about 18 inches which is a great coffee table height. Once I got my plan, I started measuring and cutting.
I measured and marked 48 inches on the door.
Then, I wrapped the area with painters tape and measured my 48 inches onto the tape. Using a straight edge (I used our long square) I drew a straight line on my tape.
 |
| Measure, tape, remeasure. |
 |
| Measure twice, cut once. Draw line over tape then cut. |
 |
| Using a saw with a laser makes cutting along your line easier. |
After my first cut I had two sections. The 4 foot section that will be the table top and the 32-ish inch section that will become the legs.
I took the 32-ish inch section and divided it by 2, taped, remeasured, and cut.
 |
| Measure, tape, remeasure then cut again. |
After only 2 cuts, I have my 3 pieces (a top and 2 legs). I used some 220 grit sand paper to smooth the edges where I made my cuts before I put them together.
Now to use the Kreg Jig. Set the drill and Kreg Jig based on the door's width. The LEGS are screwed into the top so all the Kreg Jig drills will be on the TOP, INSIDE of the LEGS. There will be 4 sets of drills on the LEGS.
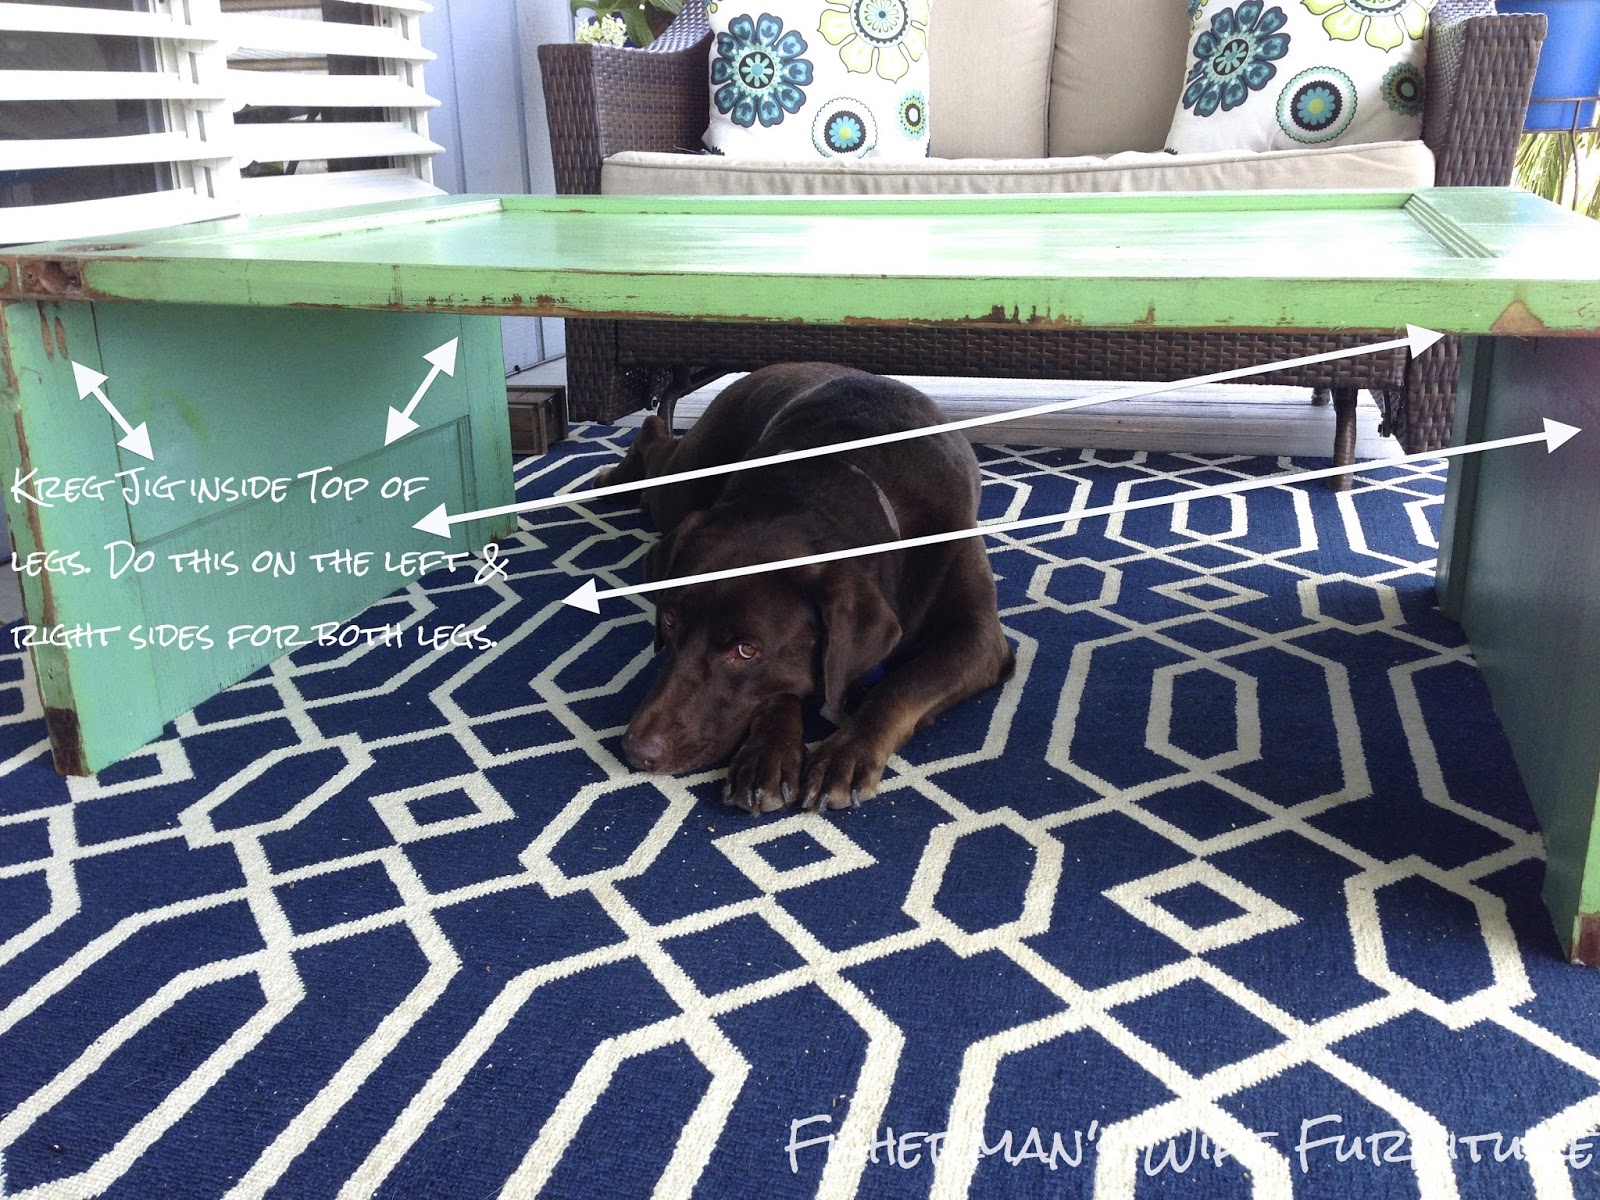 |
| I forgot to take a picture before I put the table together...OOPS. This one gives you an idea of what I am talking about. |
Once I drilled the legs, it was time to put together. Again, I forgot to take a pictures of this step...sorry...I am working on taking more pictures while I work...I just forget. I placed the coffee table top pretty side DOWN on a blanket so it wouldn't get hurt. I then screwed the legs into the top being careful to make sure my pretty sides are facing out and everything was lined up.

When the legs are screwed in, the table is pretty much done. I sanded any rough edges and wiped the table clean. It is up to you to paint or clear coat. I loved the color of my door so I didn't paint but I did use Rust-oluem Spar Varnish in Semi Gloss to clear coat since my table is going to live outside.

This makes for easy clean up and protects the paint (who knows how old or what kind it is) from bubbling and peeling due to moisture. It also keeps the wood from soaking in moisture which protects it from rot.
After my clear coat was dry, I WAS DONE!


Clear as mud, right?! Good luck for those of you who try it! I promise to have better pictures on my next tutorial :) And a better overall tutorial on my next tutorial :)
Subscribe to:
Posts (Atom)